
Multi-Room Home Audio
The purpose of this project was to have music available in several rooms at home, while being able to control everything either centrally or locally. The convenient (and extremely expensive) way is to go for a Sonos system. The cheap and fun way is, as usual, to use raspberry pi boards.
- Introduction
- Raspberry pi setup: SERVER side
- Raspberry pi setup: CLIENT side
- Testing LMS & Squeezelite
- Cabling overview
- Communicating with the amplifier module
- Automate launch at Pi startup
- Physical installation
- Installing in additional rooms
- Additional tuning for integration with gcalnotifier
- Squeezelite robustness workaround
- IR receiver sensibility to Z-Wave light dimmer control
- Misc
- Todo
- Lessons learned
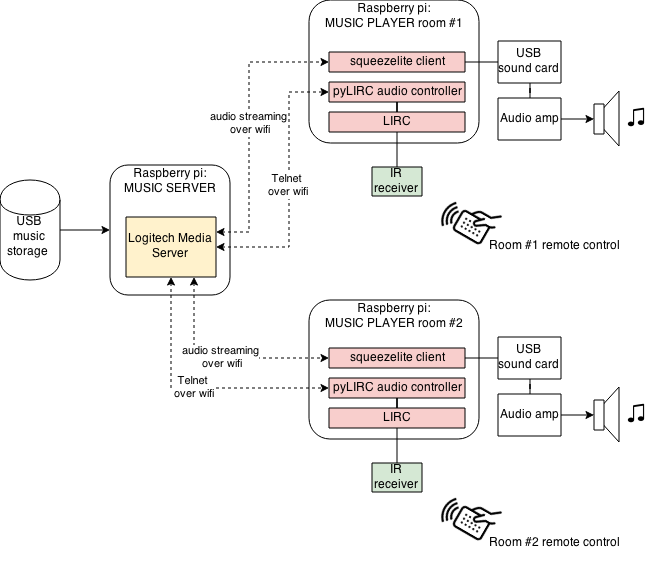
Introduction
Three main elements are involved:
- a (single) central audio streaming server
- one audio player/client per room to be equipped
- a user interface
For the audio server, my home’s main raspberry pi sounded like the default choice. There are plenty of SW options to choose from, I chose to use the well-known (if somewhat ageing) Logitech Media Server open source music server. An alternative could have been to use minidlna + BubbleUPnP. For media content storage, anything from a simple USB thumbdrive to a full-fledged NAS will do the job, depending on your needs. I chose to use a 500GB HDD USB external drive.
For the audio player/client part, given the choice of LMS as the server, the squeezelite client was a logical choice. On the HW side, since the embedded audio output on the pi is pretty low-end, a simple USB DAC will provide a decent sound quality, which I consider to be OK. Audiophiles may prefer to go for a higher-end sound card for the Pi, e.g. HifiBerry or Wolfson. I am not too fond of custom raspberry pi add-ons like these for a specific reason: their connector typically take up most if not all of the pi’s GPIO pins, making them unavailable for other purposes. Finally, since I wanted to use large external speakers beyond what a USB DAC can drive, I added an audio amplification board from Adafruit. There are cheaper options but the adafruit module is quite convenient with its 20W amplification, 3.5mm jack input, terminal blocks for speaker outputs, and has digital volume control available through I2C.
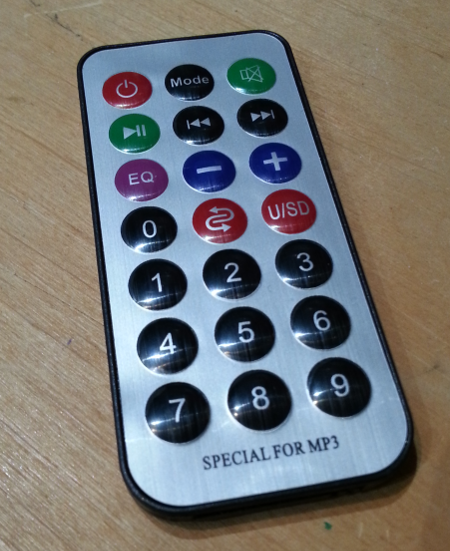
For the system control/user interface, the usual way is to rely on LMS web interface, or the corresponding phone app. I do have a logical place to access this from (HomeHub), but somehow it did not feel very convenient to have to go to the wall-mounted tablet to control the music, and since I do not carry my smartphone at all times it was not a convenient choice either. So I went for the old-style option : a remote control. A small & thin IR remote control costs a few bucks only, same goes for an IR receiver diode. On the SW side, the LIRC library is perfect to decode commands from the remote, and the pyLIRC python wrapper for LIRC provides a convenient API (a C program would be fine too, but I’m lazy)
Here’s an overview of the system:
Required components are (per room to be equipped):
- a Raspberry pi and its SD card (4GB min)
- a 5V power supply for the pi
- a USB sound card (3$ at DealExtreme)
- a wifi USB dongle (6$ at DealExtreme)
- an audio amplifier module (20W model, 20$ from Adafruit)
- a 12V / 2A power supply for the amplifier board
- a couple of speakers
- a cheap IR remote (2$ at DealExtreme)
- an IR receiver: a TSOP31238 I happened to have as a spare part

The overall cost comes down to about 70$ per room, which is not dirt cheap but still significantly lower than any commercial solution out there.
Raspberry pi setup: SERVER side
As usual, everything begins with installing a default Raspbian distribution from raspberrypi.org
1) transfer raspbian image to SD card:
sudo dd bs=1M if=XXX-raspbian.img of=/dev/xxx
2) plug-in a mouse/keyboard/HDMI display and boot-up
3) Use raspi-config to configure the raspberry as required (e.g. keyboard layout)
4) Plug wi-fi dongle, boot to graphical environment, configure wifi settings.
5) get up to date
sudo apt-get update
Installing Logitech Media Server
Install notes are taken from here and reused as is, except that LMS 7.7.3 is used:
sudo apt-get update && sudo apt-get dist-upgrade
sudo apt-get install libjpeg8 libpng12-0 libgif4 libexif12 libswscale2 libavcodec53
wget http://downloads.slimdevices.com/LogitechMediaServer_v7.7.3/logitechmediaserver_7.7.3_all.deb
sudo dpkg -i logitechmediaserver_7.7.3_all.deb
sudo service logitechmediaserver stop
wget http://raspberry-at-home.com/files/lms-rpi-raspbian.tar.gz
tar -zxvf lms-rpi-raspbian.tar.gz
sudo patch /usr/share/perl5/Slim/bootstrap.pm lms-rpi-bootstrap.patch
sudo mv arm-linux-gnueabihf-thread-multi-64int /usr/share/squeezeboxserver/CPAN/arch/5.14/
sudo mv libmediascan.so.0.0.0 libfaad.so.2.0.0 /usr/local/lib
sudo mv /usr/share/squeezeboxserver/Bin/arm-linux/faad /usr/share/squeezeboxserver/Bin/arm-linux/faad.old
sudo mv faad /usr/share/squeezeboxserver/Bin/arm-linux
sudo ln -s /usr/local/lib/libmediascan.so.0.0.0 /usr/local/lib/libmediascan.so
sudo ln -s /usr/local/lib/libmediascan.so.0.0.0 /usr/local/lib/libmediascan.so.0
sudo ln -s /usr/local/lib/libfaad.so.2.0.0 /usr/local/lib/libfaad.so
sudo ln -s /usr/local/lib/libfaad.so.2.0.0 /usr/local/lib/libfaad.so.2
sudo ldconfig
sudo chown -R squeezeboxserver:nogroup /usr/share/squeezeboxserver/
sudo service logitechmediaserver start
Setting up media storage
Create a directory to mount USB on:
sudo mkdir /media/usb
Edit /etc/fstab to automount the USB drive at boot:
sudo nano /etc/fstab
And add line:
/dev/sda1 /media/usb vfat uid=pi,gid=pi,umask=0022,sync,auto,nosuid,rw,nouser 0 0
(/dev/sda1 is how my USB drive is detected, your mileage may vary, check with sudo fdisk -l)
Raspberry pi setup: CLIENT side
Just like on the server, install a default Raspbian image
1) transfer raspbian image to SD card:
sudo dd bs=1M if=XXX-raspbian.img of=/dev/xxx
2) plug-in a mouse/keyboard/HDMI display and boot-up
3) Use raspi-config to configure the raspberry as required (e.g. keyboard layout)
4) Plug wi-fi dongle, boot to graphical environment, configure wifi settings.
Also install a telnet client, it will be used to connect to the media server:
sudo apt-get install telnet
Audio setup
Plug & configure USB sound card. In my case with this USB model it boiled down to:
sudo nano /etc/modprobe.d/alsa-base.conf
changing:
options snd-usb-audio index=-2
into:
options snd-usb-audio index=0
Installing squeezelite
Squeezelite is an open source squeezebox (i.e. Logitech original commercial audio player) emulator, using ALSA for audio output. It will connect to the Logitech Media Server, and enable local audio playback of remote media stored on the LMS. Installation steps are borrowed from here
sudo apt-get install -y libflac-dev libfaad2 libmad0
wget http://squeezelite-downloads.googlecode.com/git/squeezelite-armv6hf
sudo mv squeezelite-armv6hf /usr/bin
sudo chmod a+x /usr/bin/squeezelite-armv6hf
List the available audio devices, using the command squeezelite-armv6hf -l:
Output devices:
  null                           - Discard all samples (playback) or generate zero samples (capture)
  default:CARD=Set               - C-Media USB Headphone Set, USB Audio - Default Audio Device
  sysdefault:CARD=Set            - C-Media USB Headphone Set, USB Audio - Default Audio Device
  front:CARD=Set,DEV=0           - C-Media USB Headphone Set, USB Audio - Front speakers
  surround40:CARD=Set,DEV=0      - C-Media USB Headphone Set, USB Audio - 4.0 Surround output to Front and Rear speakers
  surround41:CARD=Set,DEV=0      - C-Media USB Headphone Set, USB Audio - 4.1 Surround output to Front, Rear and Subwoofer speakers
  surround50:CARD=Set,DEV=0      - C-Media USB Headphone Set, USB Audio - 5.0 Surround output to Front, Center and Rear speakers
  surround51:CARD=Set,DEV=0      - C-Media USB Headphone Set, USB Audio - 5.1 Surround output to Front, Center, Rear and Subwoofer speakers
  surround71:CARD=Set,DEV=0      - C-Media USB Headphone Set, USB Audio - 7.1 Surround output to Front, Center, Side, Rear and Woofer speakers
  iec958:CARD=Set,DEV=0          - C-Media USB Headphone Set, USB Audio - IEC958 (S/PDIF) Digital Audio Output
  default:CARD=ALSA              - bcm2835 ALSA, bcm2835 ALSA - Default Audio Device
  sysdefault:CARD=ALSA           - bcm2835 ALSA, bcm2835 ALSA - Default Audio Device
The bcm2835 entries correspond to the raspberry pi internal audio. In my case, the audio output from the USB sound card corresponds to front:CARD=Set,DEV=0
Let’s now make squeezelite start automatically at boot as a daemon. Gerrelt’s script will do fine.
Edit the file:
sudo nano squeezelitehf.sh
and adjust the following parameter to select the USB audio output:
SL_SOUNDCARD="front:CARD=Set,DEV=0"
I stored my custom version here.
Finally, move it to the proper location and request it to be added as a daemon
sudo mv squeezelitehf.sh /etc/init.d/squeezelite
sudo chmod a+x /etc/init.d/squeezelite
sudo update-rc.d squeezelite defaults
At the next reboot, squeezelite client will be running in the background, ready to play music.
Sharing the USB card audio output (optional)
One problem I encountered is that once squeezelite is configured this way, it will prevent any other service from using the same USB audio output. This has nothing to do with squeezelite itself, but with the ALSA sound library configuration. It may or may not be a limitation depending on the intended usage, and for this particular project alone this is not a problem, but since I wanted to host other services using audio on the same raspberry pi (e.g. GoogleCalendarAudioNotifier), I had to address this. To solve this issue, it is necessary to configure ALSA for sharing the sound output device, and this is achieved by activating the dmix plugin that will then combine the audio channels from different services/programs into a single audio output.
The configuration is two-fold, the first part consists in a custom ALSA configuration file, to be put in file /etc/asound.conf:
pcm.dmixer {
    type dmix
    ipc_key 1024
    ipc_key_add_uid false
    ipc_perm 0666
    slave {
        pcm "hw:0,0"
        period_time 0
        period_size 1024
        buffer_size 8192
        rate 44100
    }

    bindings {
        0 0
        1 1
     }
}

pcm.dsp0 {
    type plug
    slave.pcm "dmixer"
}

pcm.!default {
    type plug
    slave.pcm "dmixer"
}

pcm.default {
    type plug
    slave.pcm "dmixer"
}

ctl.mixer0 {
    type hw
    card 0
}
This piece of configuration tells alsa to declare a “dmixer” device leveraging the dmix plugin, and to set it as the default device for audio output. The second part then consists in modifying the squeezelite configuration itself (/etc/init.d/squeezelite) to modify the SL_SOUNDCARD parameter:
SL_SOUNDCARD="default"
I2C setup
Instructions for enabling I2C on the raspi are available on this page
Installing LIRC
To install the LIRC (Linux Infrared Remote Control) library that allows to read the TSOP IR receiver:
sudo apt-get install lirc liblircclient-dev
For older raspbian distro, edit:
sudo nano /etc/modules
Add the following two lines:
lirc_dev
lirc_rpi gpio_in_pin=18
For newer raspbian distros using the Device Tree mechanism, edit /boot/config.txt instead and add the line:
dtoverlay=lirc-rpi,gpio_in_pin=18
Ajust the LIRC hardware config file:
sudo nano /etc/lirc/hardware.conf
to match the following content:
# /etc/lirc/hardware.conf
#
# Arguments which will be used when launching lircd
LIRCD_ARGS="--uinput --allow-simulate"

# Don't start lircmd even if there seems to be a good config file
# START_LIRCMD=false

# Don't start irexec, even if a good config file seems to exist.
# START_IREXEC=false

# Try to load appropriate kernel modules
LOAD_MODULES=true

# Run "lircd --driver=help" for a list of supported drivers.
DRIVER="default"
# usually /dev/lirc0 is the correct setting for systems using udev
DEVICE="/dev/lirc0"
MODULES="lirc_rpi"

# Default configuration files for your hardware if any
LIRCD_CONF=""
LIRCMD_CONF=""
and reboot:
sudo reboot
Testing LMS & Squeezelite
To check that everything is in order, let’s check audio streaming (you can just plug a set of earphones at the USB DAC output for now). In this project the squeezelite client is launched at boot as a daemon. But if this not the case, one can launch it manually:
squeezelite-armv6hf -s {IP address of the pi hosting LMS}
The LMS web interface can be accessed at: http://{IP address of the pi hosting LMS}:9000, and from there it is possible to control audio playback on the client raspberry.
At initial launch, an installation wizard is executed, just tell it where your music is (in my case: on the USB drive at /media/usb/music). If the installation was ok, you should be able to play music on the client pi at this point.
Cabling overview
Let’s now add audio amplification and remote control. The different elements will be connected as depicted below:
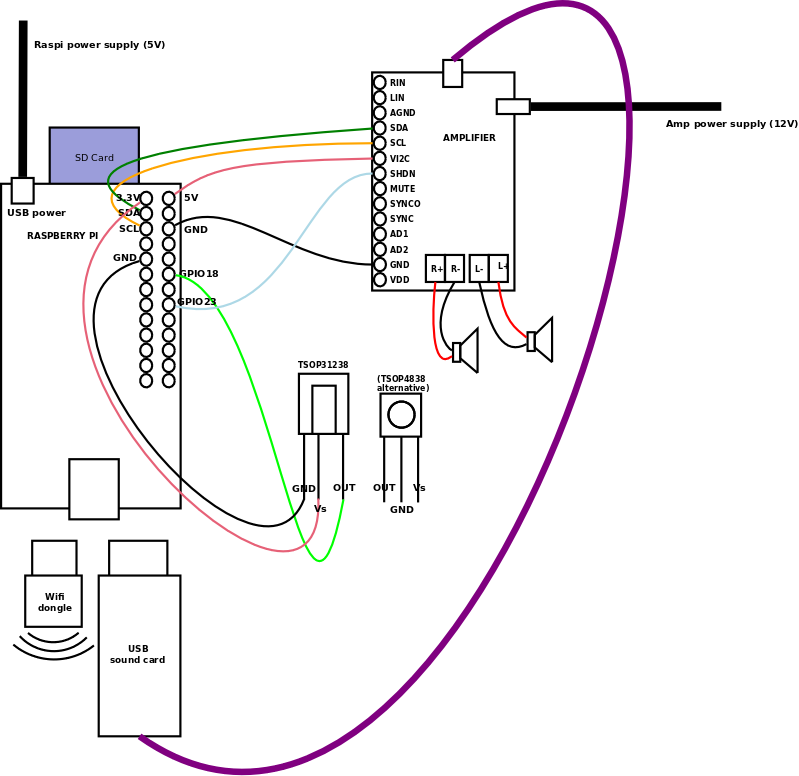
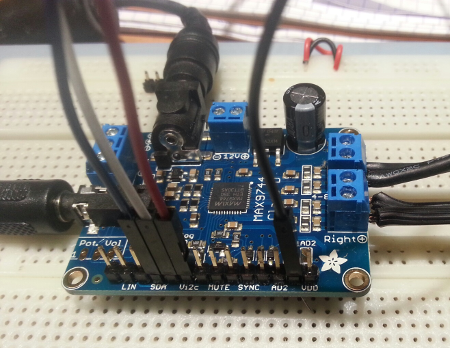
- To amplifier: GND, VI2C, SDA and SCL are the required connections for I2C communication with the amplifier to digitally adjust gain/volume. In addition, the SHDN (Shutdown) pin of the amplifier is connected to one of the pi’s GPIO, so as to be able to disable the amplifier when not used.
- To TSOP IR receiver: GND, VCC, and SIGNAL (connected to the pi’s GPIO #18, as configured in LIRC). I also successfully tested this setup using TSOP4838, taking into account its specific pinout.
Here is a work-in-progress view:
Communicating with the amplifier module
The raspberry will control the amplifier module through its I2C interface, a.k.a. 2-Wire. Communication happens over two lines:
- SDA: Serial DAta
- SCL: Serial CLock
In addition to these two pins and the GND, the reference voltage for I2C communication shall also be provided to the amplifier: just connect one of the raspi 5V pins to the amp’s VI2C pin.
Scan the bus, the amp should be detected at address 0x4B:
sudo i2cdetect -y 1

     0  1  2  3  4  5  6  7  8  9  a  b  c  d  e  f
00:          -- -- -- -- -- -- -- -- -- -- -- -- --
10: -- -- -- -- -- -- -- -- -- -- -- -- -- -- -- --
20: -- -- -- -- -- -- -- -- -- -- -- -- -- -- -- --
30: -- -- -- -- -- -- -- -- -- -- -- -- -- -- -- --
40: -- -- -- -- -- -- -- -- -- -- -- 4b -- -- -- --
50: -- -- -- -- -- -- -- -- -- -- -- -- -- -- -- --
60: -- -- -- -- -- -- -- -- -- -- -- -- -- -- -- --
70: -- -- -- -- -- -- -- --
Note: with some raspi distributions you may see a “UU” value at address 0x1b: this is due to the kernel driver for tas5713 amplifier that comes in the Wolfson audio add-on card for rasp. Not sure why this is not blacklisted by default since most people do not have this addon card on their pi, but anyway, I did not want to take any chance of an unused kernel driver using the I2C bus while I am using it to communicate with the external amplifier. So I blacklisted the TAS5713 driver:
sudo nano /etc/modprobe.d/raspi-blacklist.conf
adding this line :
blacklist snd_soc_tas5713
The protocol to communicate with the amplifier module is extremely simple : just write a volume value between 0x0 and 0x3F (63 is the max value, since volume is coded on 6 bits), at address 0x4B. For example to set volume to the medium value:
sudo i2cset -y 1 0x4B 0x20
Configuring IR remote/receiver
First, let’s stop the LIRC daemon since we will be accessing the LIRC input device for these tests:
sudo /etc/init.d/lirc stop
To check that cabling is correct and TSOP is working properly:
mode2 -d /dev/lirc0
When pressing buttons on the remote, you should see messages (“pulse xxx space yyy”) being displayed. Next, we need to generate the config file associated to our remote:
irrecord -d /dev/lirc0 -f lircd.conf
Note: the -f option is normally not necessary. It worked fine without this option with one kind of remote I had, but I had to add it for the specific model of remote I finally used, otherwise I was getting an error “Something went wrong” during the irrecord setup process.
This will guide you through a sequence of actions with the remote. First, a detection is performed by just pressing various buttons on the remote repeatedly. In the end, you will be requested to map the key codes (which names are available by executing: irrecord --list-namespace), and to press the corresponding button on the remote.
In my case, I mapped the following names/buttons:
KEY_POWER
KEY_MUTE
KEY_KPPLUS
KEY_KPMINUS
KEY_PLAY
KEY_NEXT
KEY_PREVIOUS
KEY_1
KEY_2
KEY_3
KEY_4
KEY_5
KEY_6
KEY_7
KEY_8
KEY_9
Edit the generated lircd.conf file and provide a name for your remote (e.g. “piremote”). Then copy the file to its official location:
sudo cp lircd.conf /etc/lirc/lircd.conf
Relaunch the LIRC daemon
sudo /etc/init.d/lirc restart
To test that key presses are properly taken into account, you can execute irw and push some buttons on the remote: the corresponding key codes shall be displayed.
Controlling the audio playback
The LMS has a command line interface that can be leveraged to remotely control audio playback: just telnet into the server pi on port 9090, and use the LMS CLI format. Here are a few one-liner examples:
Play:
echo "[MAC address of the squeezelite player] play" | telnet [IP address of the raspi running LMS] 9090
Pause/play toggle:
echo "[MAC address of the squeezelite player] pause" | telnet [IP address of the raspi running LMS] 9090
Stop:
echo "[MAC address of the squeezelite player] stop" | telnet [IP address of the raspi running LMS] 9090
Adjust volume:
echo "[MAC address of the squeezelite player] mixer volume -10" | telnet [IP address of the raspi running LMS] 9090
echo "[MAC address of the squeezelite player] mixer volume +10" | telnet [IP address of the raspi running LMS] 9090
echo "[MAC address of the squeezelite player] mixer volume 50" | telnet [IP address of the raspi running LMS] 9090
Mute/unmute toggle :
echo "[MAC address of the squeezelite player] mixer muting" | telnet [IP address of the raspi running LMS] 9090
Next song in playlist:
echo "[MAC address of the squeezelite player] playlist index +1" | telnet [IP address of the raspi running LMS] 9090
Previous song in playlist:
echo "[MAC address of the squeezelite player] playlist index -1" | telnet [IP address of the raspi running LMS] 9090
For a basic use, just binding remote control commands from LIRC to some of these actions will work just fine, just configure the LIRC daemon to associate specific actions to each key code. This is achieved (for example) by creating a global lircrc file in /etc/lirc:
sudo nano /etc/lirc/lircrc
Below is an example content I experimented with at some point:
begin
    prog = irexec
    remote = piremote
    button = KEY_POWER
    config = echo "not implemented yet"
end

begin
    prog = irexec
    remote = piremote
    button = KEY_MUTE
    config = echo "80:1f:02:65:39:47 mixer muting" | telnet 192.168.0.45 9090
end

begin
    prog = irexec
    remote = piremote
    button = KEY_KPPLUS
    config = echo "80:1f:02:65:39:47 mixer volume +5" | telnet 192.168.0.45 9090
end

begin
    prog = irexec
    remote = piremote
    button = KEY_KPMINUS
    config = echo "80:1f:02:65:39:47 mixer volume -5" | telnet 192.168.0.45 9090
end

begin
    prog = irexec
    remote = piremote
    button = KEY_PLAY
    config = echo "80:1f:02:65:39:47 pause" | telnet 192.168.0.45 9090
end

begin
    prog = irexec
    remote = piremote
    button = KEY_NEXT
    config = echo "80:1f:02:65:39:47 playlist index +1" | telnet 192.168.0.45 9090
end

begin
    prog = irexec
    remote = piremote
    button = KEY_PREVIOUS
    config = echo "80:1f:02:65:39:47 playlist index -1" | telnet 192.168.0.45 9090
end
Installing PyLIRC
Even though the lircrc config allows to define actions to be executed for each button, I needed a bit more flexibility: for example to implement a stateful audio controller that keeps track of current volume, or that I could turn on / turn off using a single button. Luckily, there is a Python binding for LIRC available: PyLIRC2. Installation goes like this:
1) get PyLIRC2 from https://pypi.python.org/pypi/pylirc2
wget https://pypi.python.org/packages/source/p/pylirc2/pylirc2-0.1.tar.gz
2) install the necessary python headers
sudo apt-get install python python-dev
3) uncompress it:
tar xvzf pylirc2-0.1.tar.gz
4) launch install script:
cd pylirc2-0.1/
sudo python setup.py install
5) create a python controller script and associated config file:
- the config file reuses the
lircrcformat - the controller script is homemade and very basic: it just polls pylirc for incoming commands received from the IR receiver (using the blocking mode to avoid spinning CPU for nothing), and launches a telnet command on the LMS accordingly.
On the server side, 9 playlists named playlist_xx.m3u are stored in the media folder, and pressing buttons 1 to 9 on the remote trigs one of these playlists. I mapped a few albums to some of the 9 buttons, and web radios to the others. The playlist format (m3u) is very basic, it boils down to one entry per line with the path to a song. A convenient way to generate a playlist corresponding to a full album is:
find /home/pi/music/SomeAlbumName/ -name *.mp3 | sort > playlist.m3u
A few specific details were implemented in the controller:
- on/off management: when turning the player on/off, an audio confirmation was added. Indeed, in my case the audio client pi is hidden in the ceiling, with no visible mean to check if the system is currently on or off. So I just play a small audio jingle when turning the player on, and a different jingle when turning it off. Also, upon OFF (respectively ON) command, the shutdown GPIO is set to low (respectively high) so that the audio amplifier goes to (respectively exits) shutdown/ultra low power mode.
- error management: since the pi hosting this code will not be easily accessible once installed, I added various checks & try/repeat loops to handle error cases, so that the script is as robust as possible to error conditions.
My config file is available here, and here’s the controller code. The script uses an external configuration file to store the server IP address and its own MAC address, as well as the path to the file when outputs are logged.
Automate launch at Pi startup
Once everything worked as expected, I proceeded with automating the execution of the audio controller script at startup. I chose to turn it into a background service/daemon, using these great instructions. My version is available here, I just added the --chdir option in the start-stop-daemon command to set the working directory of the service to be the one the script and its associated files are stored in, so that no absolute paths need to be specified inside the script. Just copy this script to /etc/init.d, make sure it has execution rights, then add activate this service:
sudo cp audiocontroller.sh /etc/init.d/audiocontroller.sh
sudo chmod a+x /etc/init.d/audiocontroller.sh
sudo update-rc.d audiocontroller.sh defaults
Reboot the pi: traces of the successful execution of the audio controller script should be visible in /tmp/audiocontroller.log file.
NOTE: in my case, it’s a good thing I inserted a check & retry loop on pinging the LMS server at the beginning of the script, since the wifi connection does not come up immediately at startup, and the script would otherwise exit in error.
Final touch: since at least one of the client pi is installed in my attic, I wanted to be able to power-cycle it in case of errors. To achieve this, I just plugged the pi power supply on a Z-Wave relay, that can be turned off/on remotely. See ZwaveHomeAutomation project for details.
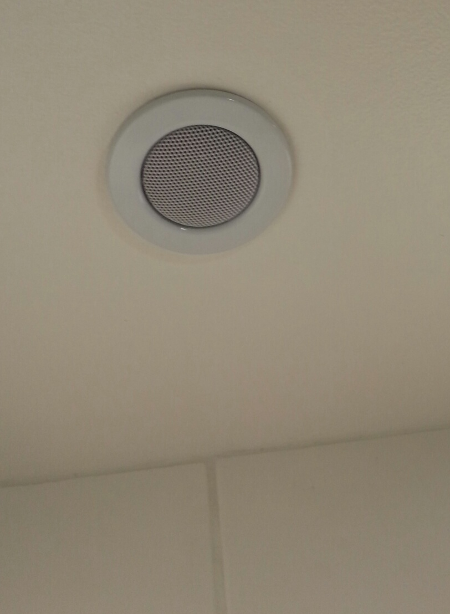
Physical installation
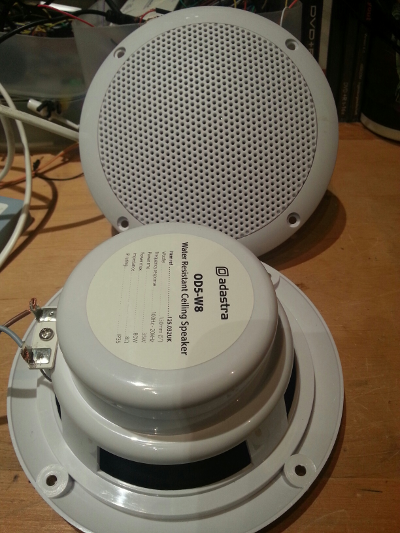
With everything up and running, I proceeded with installing the system in one of the rooms. I bought a couple of small ceiling-mountable speakers, here is what one of them looks like after being installed:
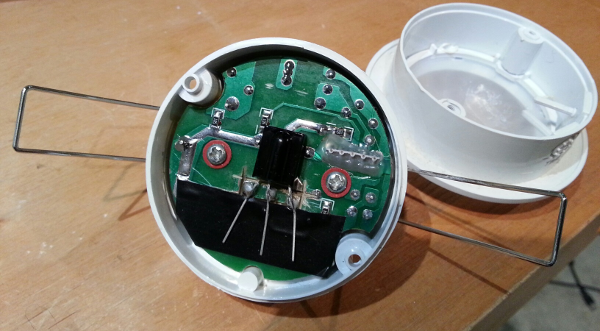
Regarding the IR receiver, there was no convenient way to hide it somewhere in the room, so I chose another appraoch: buying a ceiling-mountable presence sensor, getting rid of the electronics inside, and installing my IR receiver diode instead. Basically I just reused the casing. Here it is:
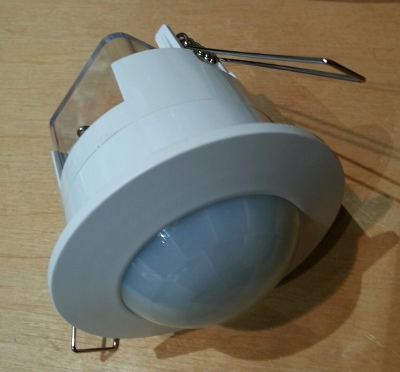
And here is the IR receiver soldered onto the front of the (now totally useless) PCB. The three leads are soldered onto an existing output connector of the module:
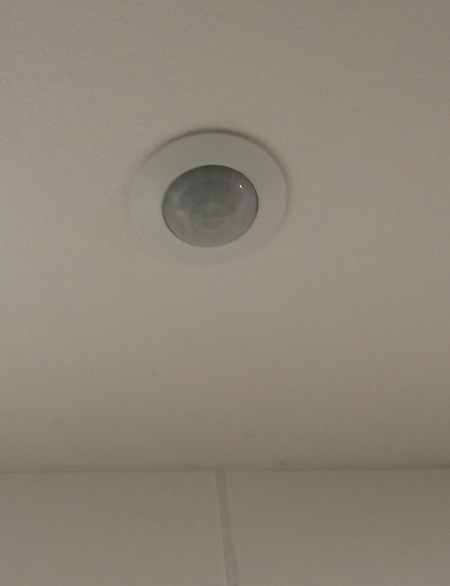
Finally, here it is installed on the ceiling:
Installing in additional rooms
The exact same steps as above can be used to install additional players in other rooms, the only required modification is to change the MAC address in the audio controller config file. Wash, rinse and repeat.
Additional tuning for integration with gcalnotifier
Based on this audio setup, I also came up with a service playing audio reminders at predefined times (from google calendar entries + voice synthesis), see this project. One problem to address was to pause music playback before the event announcement, and resume it afterwards. A few modifications were required to achieve this:
I added these two entries in /etc/lirc/lircd.conf, in the codes section:
KEY_START_ANNOUNCE              0x1234
KEY_END_ANNOUNCE                0x5678
(note: this format only works if the lird.conf file does not use raw code format, i.e. if -f option was not used. I have not found an easy way to create dummy raw_codes AND be able to simulate them, but there’s probably a way to do it…)
They are dummy entries not corresponding to any physical button on the remote, but will be used to simulate IR events from the command line, allowing gcalnotifier daemon to send requests to the audiocontroller as if they came from the remote control like the others. Consequently, I updated the pylirc conf file with these two entries:
begin
    prog = pylirc
    remote = piremote
    button = KEY_START_ANNOUNCE
    config = start_announce
end


begin
    prog = pylirc
    remote = piremote
    button = KEY_END_ANNOUNCE
    config = end_announce
end
To simulate the reception of the two corresponding IR commands, use:
irsend simulate "0000000000004660 0 KEY_START_ANNOUNCE piremote"
irsend simulate "0000000000022136 0 KEY_END_ANNOUNCE piremote"
(the key code must have exactly 16 digits and be written in decimal format)
Finally, I modified the audio controller script to react to these two events:
- when receiving “start_announce”, mute the music (if required) and activate amplifier (if required e.g. if audio controller was “off”)
- when receiving “end_announce”, unmute the music (if required), and desactivate amplifier again (unless audio controller is still “on”)
Squeezelite robustness workaround
I encountered an issue where the audio controller would stop working correctly after a few hours. The problem turned out to be in squeezelite, since the rest of the controller was still responding correctly, and just restarting the squeezelite daemon was fixing the issue. It might be related to this, especially since I only encountered this issue in the setup where audio output is shared (my other setups based on the same squeezelite with exclusive access to the sound output do not show this problem). But anyway since there was no clue in squeezelite logs as to what the problem might be, I gave up and first implemented a simple workaround: restarting the local squeezelite client every time the audio controller is turned on.
However, additional investigation showed that this robustness issue was apparently due to the use of the shared sound output through alsa’s dmix. If I turned off this sharing configuration, with the DAC being exclusively allocated to squeezelite, the setup would run A-OK for days. Since I really wanted to keep the ability to host both this music player and the calendar audio notifier on the same raspberry, I finally chose a brutal workaround: using two DACs and mixing their outputs in HW.
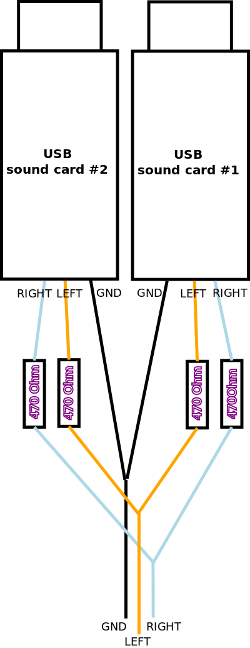
Such a simple passive HW mixing obviously has one downside: volume loss at the output. However, since in this particular setup the output of the DACs goes to an amplifier, in the end their is more than enough gain in the amplifier to compensate for that loss, so all is good.
Note: you will probably want to set the output volume of both DACs to the same volume, for proper consistent sound mixing. This is done through alsamixer as usual, just press F6 to select each DAC in turn.
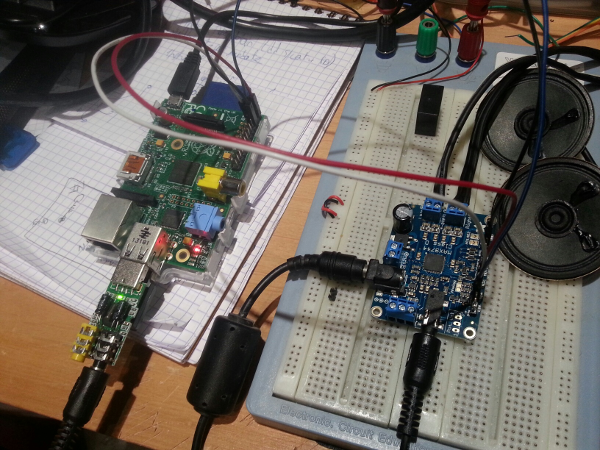
Here is my finished setup:
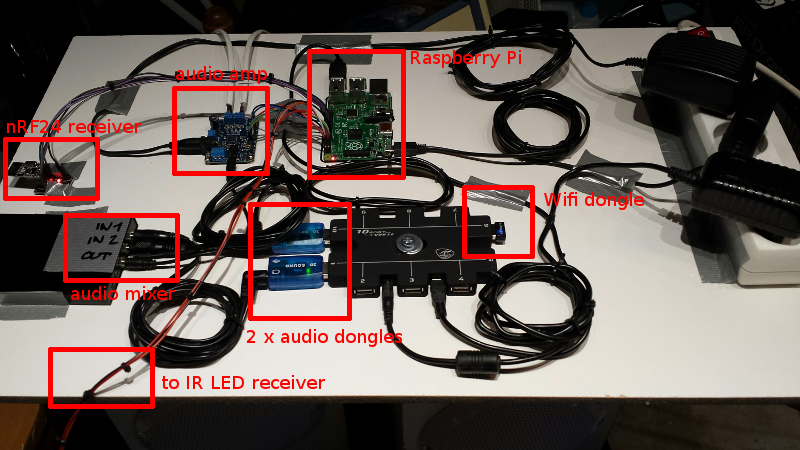
(the nRF24 radio module is present because I am running my wireless water meter on the same raspberry pi)
IR receiver sensibility to Z-Wave light dimmer control
I stumbled upon an intermittent robustness issue, where at random times the IR remote controlling the playback would work very erratically. Connecting to the client raspberry pi and launching mode2 -d /dev/lirc0, I noticed that IR pulses where being detected continuously, even when not using the remote. Here is a short snippet of the observed signal:
space 19991
space 19998
space 19993
space 19992
space 19994
space 19993
space 20005
pulse 0
space 19987
space 20015
pulse 0
space 19981
space 40022
pulse 0
space 19949
space 19996
space 19991
space 19995
space 19989
space 20001
pulse 0
space 19988
space 19996
space 19995
space 19993
space 19995
space 19992
space 19995
So, something was causing background noise on the IR signal. I quickly found out that turning off the room lights made the problem disappear, and thought of ambient light interference on the IR sensor. However, this was quite unlikely since the IR receiver is designed with built-in ambient light filtering, and the IR signal modulation at 38 kHZ is also supposed to prevent such issues.
In fact, it so happens that in the room where this setup is installed, the (LED) lights are controlled by a z-wave dimmer (see my home automation project for details), and that the dimmer module works by modulating the output power at a varying rate. With dimming level anywhere between 50% and 100%, the IR receiver picked up IR noise from this modulation, while setting the dimmer level below 50% made the interference disappear. Long story short, I finally just modified the configuration of the z-wave dimmer to set the max dimming level to below 50%, to avoid this weird interference phenomenon (note: this is done by adjusting parameter #12 Maximum dimmer level control in the configuration menu of the z-wave device). This also meant a lower max luminosity in the room, but in this specific case it was not a problem.
Misc
- I was a bit concerned regarding the amount of CPU power required to run the audio server and clients. As it turns out, streaming audio LMS takes less than 3% CPU time on the server, while on the client side squeezelite takes about 10-20% CPU time. So no big deal in either case, both the server and the client pi’s can handle a lot of additional functions.
- One note though: when idle, squeezelite client continuously sends silent data to audio output (instead of turning the audio output off) which apparently was done to avoid clicks and pops when turning the audio output on and off. It is a bit weird to see squeezelite taking up to 20% CPU time in idle, while doing “nothing”, and the blinky led on my USB DAC therefore keeps flashing continuously. As of squeezelite 1.8, there is an option (
-C <timeout in seconds>) allowing to turn off audio output if the client is idle for more than timeout seconds as an alternative to this default behavior. I did not test it yet, but found a compiled version of squeezelite1.8.3 here to do so. - I encountered cases where mp3 music playback was too fast. It turns out this was due to a mismatch between the mp3 sample rate (usually 44100kHz) and the supported rates on the selected audio output. For example, with my USB DAC, when selecting it as
front:CARD=Device,DEV=0in squeezelite startup script, it seems to only support 48000 kHz, so it was playing 44100 kHz data at 48000kHz, resulting in accelerated playback:
	pi@raspberrypi $ squeezelite-armv6hf -o front:CARD=Device,DEV=0   -d output=debug
	[18:06:25.825811] output_init_alsa:643 init output
	[18:06:25.828172] output_init_alsa:666 requested alsa_buffer: 40 alsa_period: 4 format: any mmap: 1
	[18:06:25.829251] output_init_common:342 outputbuf size: 3528000
	[18:06:25.881301] output_init_common:402 supported rates: 48000
	[18:06:25.899311] output_init_alsa:678 memory locked
	[18:06:25.901990] output_thread:467 open output device: front:CARD=Device,DEV=0
	[18:06:25.902316] alsa_open:185 opening device at: 48000
	[18:06:25.907014] alsa_open:236 opened device front:CARD=Device,DEV=0 using format: S16_LE sample rate: 48000 mmap: 1
	[18:06:25.907566] alsa_open:315 buffer: 40 period: 4 -> buffer size: 1920 period size: 480
	[18:06:25.909618] output_init_alsa:701 set output sched fifo rt: 45
	[18:06:27.552985] _output_frames:59 start buffer frames: 7535
	[18:06:27.553269] _output_frames:144 track start sample rate: 44100 replay_gain: 0
	[18:06:27.563528] output_thread:467 open output device: front:CARD=Device,DEV=0
	[18:06:27.564720] alsa_open:185 opening device at: 44100
	[18:06:27.569978] alsa_open:236 opened device front:CARD=Device,DEV=0 using format: S16_LE sample rate: 44100 mmap: 1
	[18:06:27.570361] alsa_open:315 buffer: 40 period: 4 -> buffer size: 1920 period size: 480
	[18:06:34.349284] output_close_alsa:706 close output
When selecting the same output device but with squeezelite plughw prefix (i.e. direct access to DAC hw), many supported rates showed up including 44100, and playback was fine:
	pi@raspberrypi $ squeezelite-armv6hf -o plughw:CARD=Device,DEV=0   -d output=debug
	[18:07:45.154675] output_init_alsa:643 init output
	[18:07:45.157013] output_init_alsa:666 requested alsa_buffer: 40 alsa_period: 4 format: any mmap: 1
	[18:07:45.158419] output_init_common:342 outputbuf size: 3528000
	[18:07:45.192283] output_init_common:402 supported rates: 384000 352800 192000 176400 96000 88200 48000 44100 32000 24000 22500 16000 12000 11025 8000
	[18:07:45.210337] output_init_alsa:678 memory locked
	[18:07:45.212892] output_thread:467 open output device: plughw:CARD=Device,DEV=0
	[18:07:45.213212] alsa_open:185 opening device at: 44100
	[18:07:45.218350] alsa_open:236 opened device plughw:CARD=Device,DEV=0 using format: S32_LE sample rate: 44100 mmap: 1
	[18:07:45.220322] alsa_open:315 buffer: 40 period: 4 -> buffer size: 1764 period size: 441
	[18:07:45.226598] output_init_alsa:701 set output sched fifo rt: 45
	[18:07:47.165681] _output_frames:59 start buffer frames: 4079
	[18:07:47.166027] _output_frames:144 track start sample rate: 44100 replay_gain: 0
	[18:07:52.750732] output_close_alsa:706 close output
Todo
I’d like to leverage the newly added audio capabilty in each equipped room for:
- adding a microphone to the setup, in order to use the client pi as intercom endpoints between rooms.
Lessons learned
- for once, everything initially went very smoothly: IR remote control with LIRC is a breeze to setup and use, the pi is easy as ever to setup, and controlling the audio amplifier through I2C and GPIOs worked the first time.
- there were however a few hiccups after a while:
- The squeezelite robustness issue & Z-wave module interference mentionned above.
- I did struggle to get a (very) stable wifi configuration. Refer to this page for various wifi-related tips on the raspi.
- On one of the raspi, I got random short blank gaps during music playback, with no obvious error in squeezelite logs. I finally fixed those by using the
plughwformat in the selection of the audio output in suqeezelite startup script.
- I realized that sometimes, just pushing a button on a (physical) remote is way more convenient than grabbing you phone, unlocking it, navigating to a specific app, opening it, and finally clicking somewhere.
- 2x20W amplification is plenty enough for small rooms, I never had to turn the volume all the way up, by far. A different approach with be required for the living room audio though.