Z-Wave home automation
I had been considering using some kind of home automation system for a while, and decided to give it a go.
- Usecase
- Security warning
- Z-Wave controller
- Z-Wave slaves
- Network Inclusion
- Associations
- Device installation & configuration
- Automation software
- Z-Way Server automation engine
- Lessons learned
Usecase
The first usecase is quite simple: not having to go upstairs to check if the lights were actually turned off, before leaving the house. In other words: lazyness.
The secondary usecase was to be a little eco-friendly and turn off all unnecessary electrical devices when leaving the house (e.g. TV/TV box, that still consume significant power even in standby mode).
Several technologies exist for home automation (e.g. the old X10 wired communication over power lines, or wireless Zigbee communication), I chose Z-Wave because it seemed to be becoming the standard (but time will tell if this will be the case) and seemed to have interesting capabilities/flexibility in the home network management. This is NOT a cheap technology though, so be ready to invest a few hundred dollars in your home automation, or go another way (e.g. simpler 433 MHz RF devices)
Z-Wave operates at 868.42 Mhz in Europe (908.4MHz in the US). A Z-wave network is composed of one or several controllers, and one or several slave devices.
Here is an example setup with one primary controller, one secondary controller running on batteries, several slave devices plugged on main power to manage lights, power outlets, or other things:
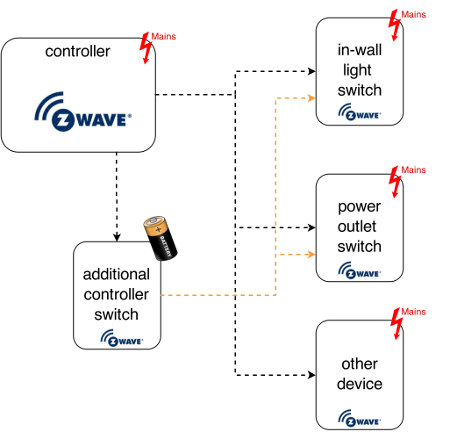
Slave Z-Wave devices can send information (e.g. a power plug reporting current power consumption), notifications (e.g. device button X was pushed), receive commands from a controller (e.g. turn ON or OFF). The primary controller can also orchestrate specific command scenarios (“scenes” in the Z-wave world) upon receiving specific trigger events.
Security warning
Z-wave is still a relatively young technology, and has been shown to be prone to security flaws (well, pretty much like any other technology out there). I chose not to rely on Z-wave devices for anything security-related in the house, and restricted its use to power control of non-critical devices. Extreme worst case scenario: someone could remotely turn my lights on and off…I can live with that risk (what I would not do is trust Z-wave for the control of my main door, or the house alarm system…)
Z-Wave controller
The controller can be a simple remote control running on batteries, but is usually a dedicated box plugged somewhere in the house on mains power, that one can typically connect to over wifi through a web interface. Plenty of commercial options are available, and are the right way to go to get a Z-wave network up and running with zero effort. But spending around 300$ for a box including a CPU, Linux, an integrated Z-wave controller, and some (usually proprietary) management software seemed a little expensive to me. The alternative I chose was to use a Z-wave add-on HW interface (RaZberry) and its associated ZWay SW on a Raspberry Pi, which brings the total cost down to less than 100$. Also, the Razberry is small enough to fit directly into most of the Raspberry pi cases:
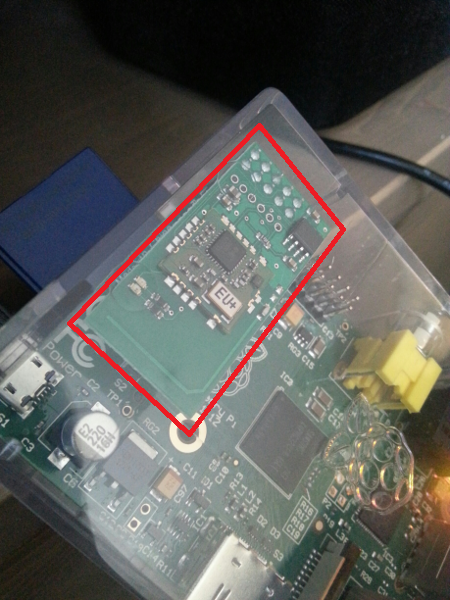
Since I was already using a raspberry pi as a home server for other purposes, adding this small zwave add-on controller spared me the trouble of adding yet another external box with associated cabling/power supply. Integration !
Razberry Z-Way software setup
To control the razberry module, the basic option is to install the Z-Way framework (from Razberry manufacturer) on the raspberry pi:
wget -q -O - http://razberry.z-wave.me/install | sudo bash
Then, a control interface is available on the raspberry pi at this URL:
http://<IP address of the Raspi>:8083
Usage is quite straightforward, and the interface is more than enough for manual management/control of any device in the Z-wave network. More on this later.
Z-Wave slaves
There are many types of slave Z-wave devices, for my specific usecase I bought the modules mentionned hereafter.
Lighting control
This is my #1 usecase (remotely turning any light on or off), and my primary concern was to make the automation of lighting control completely transparent and “100% backward compatible” with manual use of the switches. As it turns out, the most convenient solution to retrofit an existing installation is to install small z-wave micro-modules directly inside the existing switches cavities in the walls.
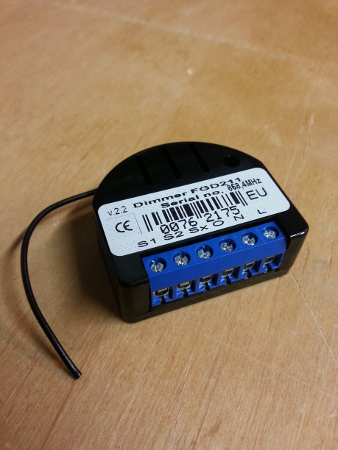
I chose micro-modules from Fibaro, since they seemed to be quite small and of good quality. As a side note: as these things will be embedded within the walls of my house, I did not even consider searching for cheaper modules. Cutting budget on such critical devices is probably a very very bad idea.
Several versions of micromodule exist, and in particular, you have to choose between relays (on/off) and dimmers (allowing continuous variation of the voltage between completely-off and completely-on). On/Off functionality was all I needed, but I bought dimmers anyway for all lights, for the following reasons:
- only the dimmer modules can be installed with no Neutral lead available, which is often the case of old installations, and is the case in my house.
- relays and dimmers are about the same price anyway
- and it’s cool to have the ability to gradually fade-in/out the lights in some scenarios if needed.
Here is a Fibaro dimmer micro-module, with the small antenna sticking out:
Power outlet control
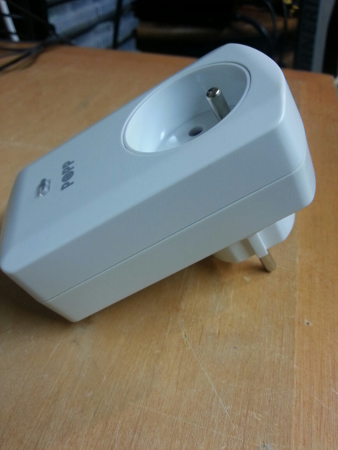
For controlling power outlets, I used a different approach: while it is quite possible to use micro-modules integrated inside the power outlet cavities just as for wall switches, one major drawback with this solution is that one cannot control the state of the micro-module manually (since there is no button on a power outlet…). This means that if the outlet is turned off remotely, there is no way to turn it back on manually, which can turn out to be quite inconvenient. A more practical solution for me was to use external Z-wave power plugs, plugged externally in the existing outlets. The difference is that those devices do have a button on their casing, allowing manual override of the device state.
The drawback is of course that such external devices are quite noticeable, and most of them are bulky:
But it turns out that Fibaro sells Z-wave power plugs (FGWPE/F-101) that are much much smaller, so the visual impact is quite limited, and they still have an override button on the casing to operate the plug manually if needed:
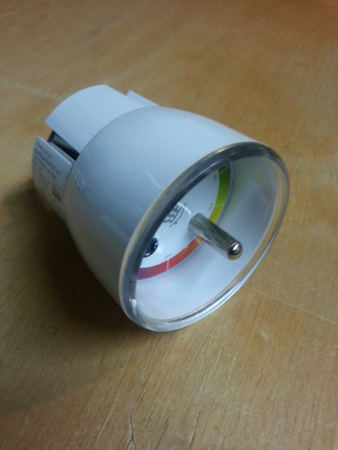
Hats off to Fibaro for optimizing the device volume to that extent. Finding out about this product is the main reason why I went ahead with equipping several of my outlets with Z-wave capability.
Additional wall controller
While I retrofitted all existing wall switches in the house with micro-modules, I also wanted to introduce the new usecase: turning off a predefined list of devices when leaving the house to save power (and turning some of them back on upon entering the house). It is easy to do such an action from a web interface, possibly from a smartphone, but it did not sound very convenient to me for something that would be done at least twice a day.
Since all existing wall switches had their own purpose already, I wanted a new dedicated button to control this new usecase. Installing a new (wired) wall-switch is not convenient, so I chose to buy a standalone Z-wave battery-powered wall controller (Z-Wave.Me 06443), that looks like a regular wall-switch, but can be attached anywhere on a flat surface.
Here’s how it looks without the cover:
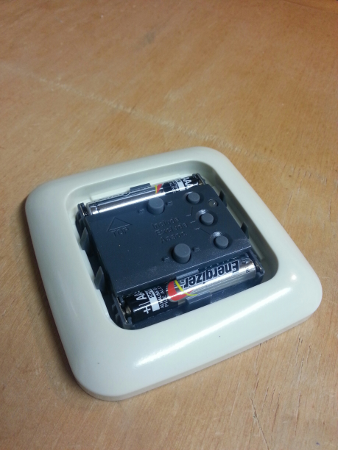
Notice two main buttons (UP and DOWN), plus three buttons for managing the device: Include, Exclude, and Association
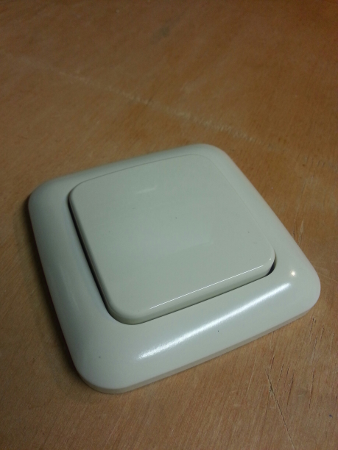
Once the cover is installed, there is no way to tell this is a Z-wave device and not a regular wall-switch.
More later on how I used this wall controller.
Color LED controller
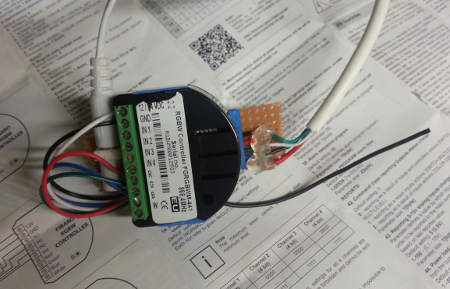
Controlling the intensity and color of lighting is a typical home automation usecase, and while I did not really have any actual use in mind for this, I bought an RGB LED strip controller (Fibaro FGRGBWM-441) because of…reasons. The Fibaro module I chose also happens to be usable for many other purposes, like general purpose voltage inputs/outputs, so it was really not a waste of money.
Here is the RGBW module with glued-on hackish interface for input power and output wires to LED strip:
Network Inclusion
By default, a slave Z-wave device does not communicate with anything. To use it, one must add it to a specific Z-wave network, supervised by a primary Z-wave controller (in my case: the Raspberry+Razberry module). The inclusion process is very straightforward:
- set the primay controller in learning/inclusion mode (for example through the Zway web interface)
- push any button on the slave device (sometimes a triple-click is required)
Unless an error occurs, this results in the slave device now being included in the Z-wave network managed by the primary controller. It is then able to send/receive information, and to be controlled remotely.
Associations
Many Z-wave devices implement so called association groups, i.e. the ability to associate a single action on the device to a resulting action on several other devices. The one usecase I had for this is to have a single wall switch control all devices that I want to turn off when leaving the house. By adding all these target devices in one of the association groups of the wall-switch, I can turn them all on (or off) by a single push. I chose a different approach in the end (more on this later), but using association groups is perfectly fine.
Device installation & configuration
in-wall switches
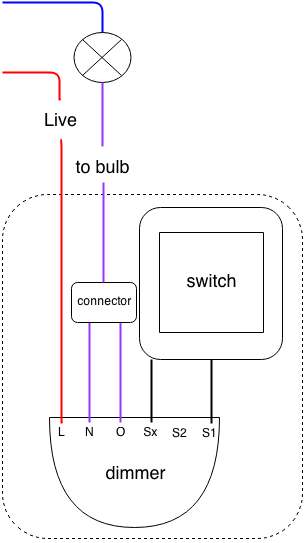
The Fibaro dimmer micro-module has inputs to connect mains power, as well as inputs to connect the existing physical switch. There are several cabling options,here is the one I used for simple light switches with no neutral lead:
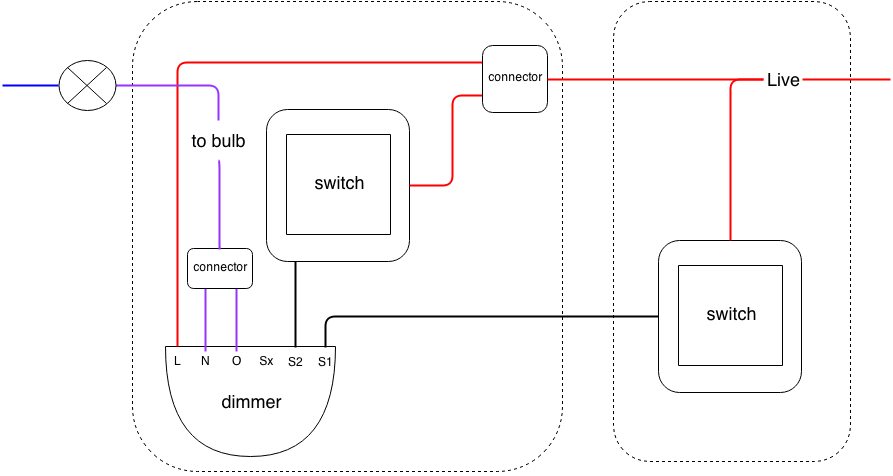
For lights controlled by 3 way-switches (still without neutral), cabling scheme is a bit different:
Below is a picture of the installation in progress (the tricky part is then to arrange all of this inside the yellow box…it fits, but barely)
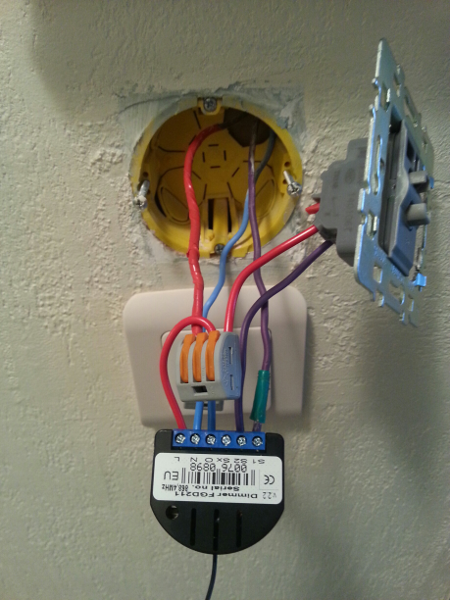
Once the micro-module is installed with the original switch mounted back where it used to be, the switch can be controlled remotely (that’s the whole point…) but can also be operated manually as before, making this module integration completely transparent to the user.
I configured all dimmers with a fade time of zero, so they behave exactly like pure on/off switches: this is achieved by setting parameter #10 to 0 (“Disable the smooth change in light intensity”)
Also, if using a two-positions switch, parameter #14 must be adjusted to “Bistable switch”
Finally, for 3-way switches, parameter #17 must be adjusted to “enabled”
Battery-operated wall controller
I wanted to use the battery-operated wall controller as a source of events to trig various actions. There are two main ways to achieve this:
- add other devices in the controller’s built-in association groups. This has the advantage to not involve any external software or hardware, but this is somehow inconvenient to setup (i.e. need to manually associate each target device using a complex sequence of button pushes), and is only good for “switch on / switch off” actions.
- the more flexible option I chose is to use this switch as a scene trigger (it is then entirely up to the main controller software to decide what to do when such a scene is triggered). To achieve this, set parameter 13 and parameter 14 to 3. This way, various scenes can be triggered by activating the UP or DOWN buttons. I only used the two main ones: single click on UP (trigs scene 1) and single click on DOWN (trigs scene 2)
Note: battery-powered z-wave devices are a bit difficult to configure, since they are designed to go back to sleep mode immediately after having been activated, to save power. There is usually a specific action allowing to keep the device awake for a few seconds, so that the configuration commands from the controller can be taken into account. On this Z-Wave.Me wall controller, a triple click on UP or DOWN will keep the device awake for 2 seconds.
power-plugs
You may want to adjust the color of the LED ring used when the plug is activated. For example, for a plug placed in a bedroom, having it emitting light when it is on can be a nuisance during the night. Parameter #61 allows to not have the LED ring turn on when the device is activated (though it makes it harder to tell the current state of the plug, obviously)
RGBW LED controller
I setup the Fibaro RGBW module in “MODE1” (parameter 6 set to 1), and adjusted parameter 10 to 4 to get a faster fade-in/fade-out time than the default setting.
Automation software
Beyond just configuring/managing the modules, the real software added value comes with the capability to implement custom rules to activate devices upon specific conditions. Indeed, while it is perfectly possible to only rely on the Z-wave HW mechanisms (associations, scenes, alarms messages) between modules, it will not allow to implement very specific scenarii. This is where the software automation frameworks come in. I experimented with two of these, there are many more to choose from:
- Z-Way itself. Indeed, Z-Way not only provides the management interface for the RaZberry, it also provides several programming APIs to develop automation scripts.
- Open Home Automation Bus, http://www.openhab.org/). This is a general purpose home automation framework, supporting Z-wave devices as well as many other communication protocols, which makes it a good opportunity for future extensions.
Spoiler alert: I really liked the OpenHAB framework, but it turns out that it (currently) has a major known bug affecting the RaZberry (see “known limitations” on the Z-wave binding page of the openHAB project), and the impact is so bad that I had the give up using it. I switched back to using the Z-Way server automation capabilities, which fit my needs just fine after all, and are not so Z-wave-dependent as I initially thought. Anyway, details about both setups are provided below.
OpenHAB
Installing openHAB
OpenHAB is a java framework. Considering Java is already installed on your raspberry pi, the installation is as simple as:
mkdir /home/pi/openHAB
unzip distribution-1.5.1-runtime.zip
(Optionally, a demo configuration can be installed, just unzip the distribution-1.5.1-demo-configuration.zip)
-
Install the Z-wave add-on: unzip the associated .jar file from
distribution-1.5.1-addons.zip, and copy it into the/addonssubdirectory -
Create the user configuration file:
cp configurations/openhab_default.cfg configurations/openhab.cfgthen manually edit this openhab.cfg as appropriate. In my case, I just updated the Z-wave section to specify the correct interface to the Razberry: zwave:port=/dev/ttyAMA0
-
Tweak the startup scripts (
start.shandstart_debug.sh) to add the parameter-Dgnu.io.rxtx.SerialPorts=/dev/ttyAMA0as part of the java command line -
create the z-wave items configuration files. As an example to control a single Fibaro plug and read its power consumption reports, create a
z-wave.itemsfile in the/configurations/itemssubdirectory, with the following content:
Switch FibaroPlug_1 "Fibaro plug #1" (Outlets) {zwave="5:command=switch_binary"}

Number FibaroPlug_1_Power      "Fibaro plug #1 power [%.1f W]" (zPower) { zwave="5:command=sensor_multilevel" }

Number FibaroPlug_1_Energy     "Fibaro plug #1 consumption  [%.2f KWh]" (zPower) { zwave="5:command=meter" }
- create a basic UI config file to manipulate this plug, by creating a
z-wave.sitemapfile under/configurations/sitemaps, with the following content:
sitemap my_z_wave label="Z-Wave devices control" {
   Frame label="Plug" {
        Switch item=FibaroPlug_1 label="plug #1"
   }
   Frame {
        Text item=FibaroPlug_1_Power
   }
}
-
To prevent conflict with Z-way (if installed), stop it:
/etc/init.d/Z-Way stop -
Finally, launch openHAB:
./start.sh -
On raspberry pi, the initialization takes a loooong time (up to several minutes), but once everything is done you can access the UI using any browser at the following URL:
http://<IP of the raspberry pi>:8080/openhab.app?sitemap=z-wave -
Optionally, if you installed the demo config files, the demo itself is available at :
http://<IP of the raspberry pi>:8080/openhab.app?sitemap=demo
Installing HABmin
HABmin is an administration interface for openHAB, and is available here: https://github.com/cdjackson/HABmin
Installing HABmin boils down to unzipping HABmin.zip in the openHAB folder, and relaunching openHAB. The HABmin interface is then available at http://localhost:8080/habmin/index.html
In particular, Z-way devices information and parameters can be accessed and modified (via Bingings / Z-Wave / Devices), making HABmin a useful replacement for the Z-way management interface
Automating openHAB startup
- Remove auto-start of Z-way
sudo update-rc.d z-way-server remove- Create an
openhabstartup script in/etc/init.d(initially from here)
My customized version is available here
Finally, make it executable and add it to startup daemons:
sudo chmod a+x openhab
sudo update-rc.d openhab defaults
Custom config files
I then customized the openHAB configuration files to suit my specific needs. One specific behavior I implemented is to use the wall controller to turn off all lights and some other devices (e.g. TV) while leaving the house, and turn these devices back on when entering the house. Also, to make sure that the action on the wall controller is properly taken into account, I added a visual confirmation, using the Fibaro RGBW module controlling a color LED strip.
The two buttons of the wall controller are first declared in the items config, with their associated z-wave class and scene number:
Switch	WallSwitch_Scene1	"Wallswitch scene 1" 	(scenes)	{ zwave="25:1:command=SCENE_ACTIVATION,scene=1,state=1"}
Switch	WallSwitch_Scene2	"Wallswitch scene 2" 	(scenes)	{ zwave="25:1:command=SCENE_ACTIVATION,scene=2,state=1"}
Note that these two “Switch” items are only used to capture the scene activation command from the wall controller. They are not intended to be presented in the UI. Then, two specific rules allow to react upon receiving “scene 1 activated” or “scene 2 activated” events:
rule "Activation Mode Eco via Wallswitch"
when
	Item WallSwitch_Scene2 received update ON
then
	sendCommand(entree_mode_eco, OFF)

	sendCommand(RGBWControllerR, 0)
	sendCommand(RGBWControllerG, 0)
	sendCommand(RGBWControllerB, 100)

	createTimer(now.plusSeconds(2)) [|
		sendCommand(RGBWControllerAll, OFF)
	]
end

rule "Desactivation Mode Eco via Wallswitch"
when
	Item WallSwitch_Scene1 received update ON
then
	sendCommand(sortie_mode_eco, ON)

	sendCommand(RGBWControllerR, 0)
	sendCommand(RGBWControllerG, 100)
	sendCommand(RGBWControllerB, 0)

	createTimer(now.plusSeconds(2)) [|
		sendCommand(RGBWControllerAll, OFF)
	]
end
The first rule (“leaving the house” usecase) defines that upon reception of scene1 event, an OFF command is sent to a specific group of items, i.e. the items that shall be switched OFF. Once this is done, a command is sent to the RGB LED controller to shine a blue light during 2 seconds as a confirmation, then turn the LED back off. The second rule (“entering the house” usecase) similarly defines what happens upon reception of the scene2 event, i.e. send a command to a different group of items, the ones that shall be turned ON.
Note that the two groups are different: indeed, I wanted to turn off all the home lights (plus some additional devices) while leaving, but upon entering I only wanted to turn on the additional devices, not all the lights.
As a reference the items/sitemaps/rules config files corresponding to my full setup are available here
Fibaro Dimmer workaround for openHAB
Initially, when just declaring a Dimmer (or Switch) item in openHAB corresponding to one of the Fibaro dimmer modules, the state change notifications from the dimmer were not getting processed properly. It might be a wrong default behavior in openHAB Z-Wave binging, but in any case there is a simple workaround: just adding the main controller (Node 1) in the association group of each dimmer. Once this is done, manual operations on the dimmers is picked up correctly by openHAB and reflected in the UI. For Fibaro wall-plugs, this workaround was not required.
Z-Way Server automation engine
The Z-way software includes a Javascript-based automation engine, allowing to implement custom rules based on a very flexible (and relatively straightforward) mechanism: it provides a software event bus, on which the javascript automation modules can emit and receive events. Each module has access the the Z-way API allowing to control Z-wave HW devices, and can register to be notified when any data of the Z-way data model is modified (e.g. when a new value/state of a device is received by the RaZberry).
So provided Z-way server is already installed, the only required actions to implement an automation module is to create a subdirectory under the /opt/z-way-server/automation/modules directory, and inside this subdirectory create two files:
-
module.json: this is just the configuration file for the module, which is useful to be able to modify some parameters of the automation module from the web control interface (
http://<ÌP address of the Raspi>:8083/z-way-ha) -
index.js : this is the javascript code for the module, implementing the custom rules.
The module I implemented so far is very basic, but is enough to fit my primary usecase: turning off a set of selected devices upon pushing the wall controller DOWN button, and turning another set of devices back on upon pushing the wall controller UP button. In addition, to provide a visual feedback that button pushes have actually been taken into account, I temporarily turn on a nearby RGB LED strip, with a different color for UP and DOWN actions. The javascript code looks like this:
EcoMode.prototype.init = function (config) {
    EcoMode.super_.prototype.init.call(this, config);

    var self = this;

	// Register a callback function on modifications of the "currentScene" value of command class 43 (SCENE_ACTIVATION) of the wall controller switch
	zway.devices[1].instances[0].commandClasses[43].data.currentScene.bind(function() {
		var value = zway.devices[1].instances[0].commandClasses[43].data.currentScene.value;
		console.log("EcoMode: SCENE detected = ", value);

		if (self.timer) {
		    // Timer is set, so we destroy it
		    clearTimeout(self.timer);
		}

		// Scene = 2 correponds to button DOWN pushed
		if (value === 2) {

			// Turn on the RGB LED (to full blue color) to show ongoing
			// transition to ECO mode
			//blue
			zway.devices[24].instances[2].SwitchMultilevel.Set(99);
			//red
			zway.devices[24].instances[3].SwitchMultilevel.Set(0);
			// green
			zway.devices[24].instances[4].SwitchMultilevel.Set(0);


			// Turn off FIBARO plug #1
			zway.devices[5].instances[0].SwitchBinary.Set(0);

			//
			// etc... for all other devices to be turned off
			//

			console.log("EcoMode is now ON ");

			// Turn LED back off to show completion (after 2 second delay)
			    self.timer = setTimeout(function () {
				// RGB notification
				zway.devices[24].instances[2].SwitchMultilevel.Set(0);
				self.timer = null;
			    }, 2*1000);


			// Scene = 1 correponds to button UP pushed
	        } else if (value === 1) {

			// Turn on the RGB LED (full green) to show ongoing
			//transition out of ECO mode
			// green
			zway.devices[24].instances[4].SwitchMultilevel.Set(99);
			// red
			zway.devices[24].instances[3].SwitchMultilevel.Set(0);
			// blue
			zway.devices[24].instances[2].SwitchMultilevel.Set(0);

			// Turn FIBARO plug #1 back on
			//zway.devices[5].instances[0].SwitchBinary.Set(255);

			//
			// etc... for all other devices to be turned off
			//

			console.log("EcoMode is now OFF");

			// Turn LED back off to show completion (after 2 second delay)
			    self.timer = setTimeout(function () {
				zway.devices[24].instances[4].SwitchMultilevel.Set(0);
				self.timer = null;
			    }, 2*1000);

	        } else {
			console.log("EcoMode: unknown scene (", value, "): IGNORING");
		}
	 });
};
The module is so simple it does not have any other function that the “init” function called automatically at startup. The actual code is available here
Lessons learned
- Z-Wave is (still) expensive, but quite flexible
- Raspberry pi + Razberry module are quite fine as a replacement for a commercial home automation controller
- Battery-powered Z-wave devices are not convenient to configure, since they go to sleep immediately after being activated.
- openHAB is a great framework for home automation, and supports Z-wave quite well. Too bad it is plagued with a vicious bug specific to raZberry module…
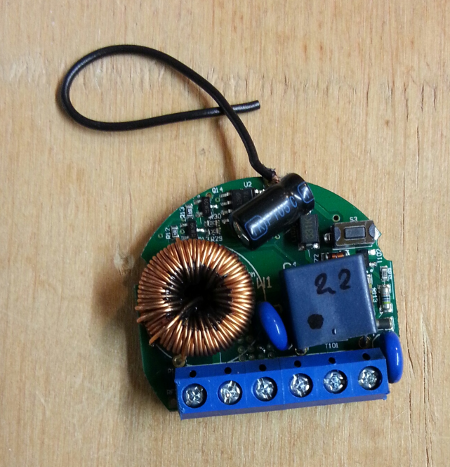
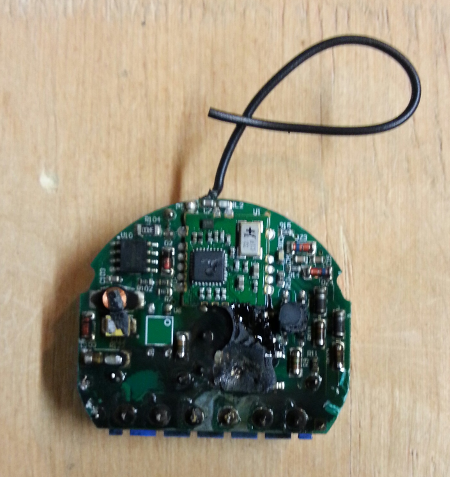
- Always triple check wiring before turning mains back on after installing a switch module. I was lazy once after installing several modules in a row with no problem, I got confused by unusual wire colors, and the dimmer module went “boom” (literally) due to incorrect cabling. That’s a 50 euros mistake you will only do once. Anyway, this was the opportunity to take a look inside the dead module: