
ZWave control Widget
My home automation setup is based on Z-wave devices controlled by a Z-way server (see here). Even though there are nice UIs provided with Z-way, I wanted to have something minimalistic that would visible at all times, without the need to launch a specific app/URL. So I thought a little Android homescreen widget running on my HomeHub tablet would be nice.
Overview
The widget turned out like this:
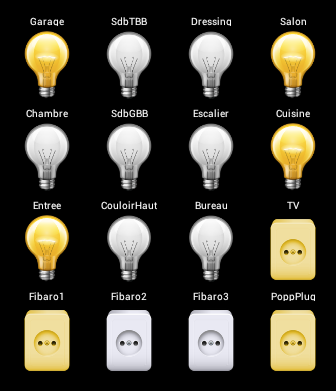
This allows me to have a visual status of 16 z-wave devices at once, and toggle any of them by touching the associated image.
Implementation
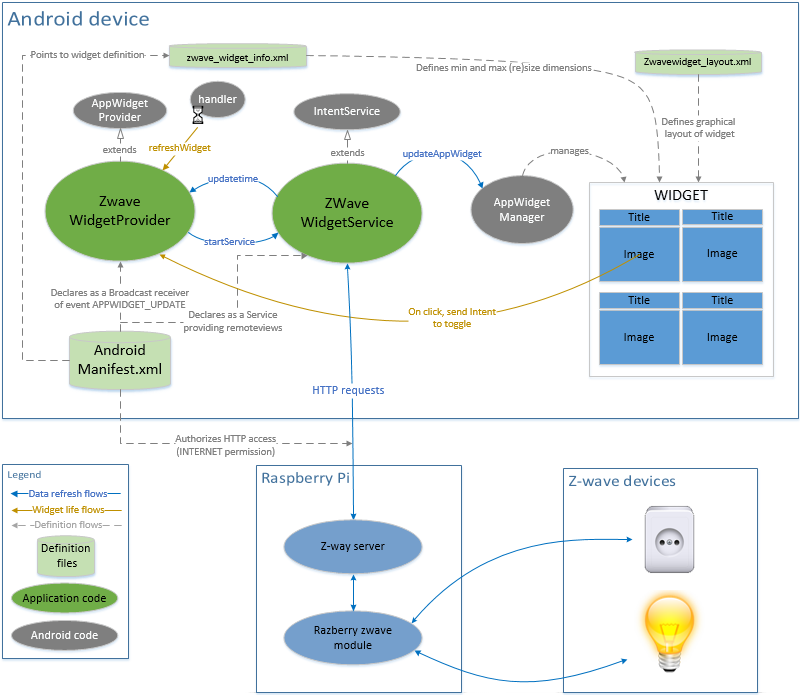
ZWaveWidgetProvider
The first specificity is that the usual APP_UPDATE mechanism that serves to refresh homescreen widgets is not used in this project. The reason is that many Android versions put a lower limit to the possible refresh rate, mainly to save battery on mobile Android devices. I want my z-wave devices statuses to be refreshed very often, and my target usecase is a wall-mounted Android tablet, so I really don’t care about battery-related constraints. So, I set android:updatePeriodMillis to 0 in the widget’s definition file, and instead used a custom Handler with a Runnable function called every 2 seconds to refresh the widget.
Only the very first onUpdate call is useful, to register the click callbacks on each device icon, and kick-off the background auto-refresh Runnable.
Since refreshing the widget involves performing HTTP requests (that could take an arbitrarily long time to complete), it gets done in a separate asynchronous Service. Also, when a user touch/click on a device is detected, a service is started to perform the device state toggle, for the same reasons.
ZWaveWidgetService
The service class is where the work gets done. It manages three types of requests from the widget provider, described below.
initialize widget
The widget UI is initially set by performing a set of HTTP requests on each device to get their current state:
http://[IP address of Z-way server]:[Z-way port]/ZWaveAPI/Run/devices[xx].instances[yy].commandClasses[zz].Get()
This forces the z-way server to request the device to send fresh data. This data can then be read on the server using another HTTP call. Since I only care about the current activation status of my wallswitches and wallsockets, I just get the current level value using:
http://[IP address of Z-way server]:[Z-way port]/ZWaveAPI/Run/devices[%s].instances[%s].commandClasses[%s].data.level
The initialization routine also retrieves the current time at z-way server level and stores it (more on this below)
refresh widget
This is the part that gets called every 2 seconds, to refresh the state of each device. The Z-way server conveniently provides a way to get the list of all state changes that happened since a given time:
http://[IP address of Z-way server]:[Z-way port]/ZWaveAPI/Data/[timestamp]
The timestamp is provided in unix time format (seconds elasped since Jan 1st 1970). So, when refresh is called, it passes the (server-side) timestamp of the previous refresh call, and gets in return the list of all device states that have changed in the meantime. Sweet! And much more efficient than having to poll every device individually. In addition to the list of state changes, the returned data contains an updateTime field, that will be used during next refresh call.
The service then parses this returned data, and checks for each displayed device if a change happened. If it did, there will be an entry of the form devices.xx.instances.yy.commandClasses.zz.data.level in the data, where xx is the device Id, yy is the instance id within this device, and zz is the command class number (e.g. “38” for SwitchMultiLevel change)
For example, update data received after device 27 is switched on looks like this:
{
    "devices.27.data.lastSend": {
      "name": "lastSend",
      "value": 901523000,
      "type": "int",
      "invalidateTime": 1471186223,
      "updateTime": 1471199877
    },
    "devices.27.data.lastReceived": {
      "name": "lastReceived",
      "value": 0,
      "type": "int",
      "invalidateTime": 1471186223,
      "updateTime": 1471199877
    },
    "devices.27.instances.0.commandClasses.38.data.level": {
      "name": "level",
      "value": 99,
      "type": "int",
      "invalidateTime": 1471199876,
      "updateTime": 1471199877
    },
  "updateTime": 1471199878
}
Note: for some weird reason, ONE of my Fibaro dimmers has its state changes sometimes notified to the server under a different/generic set of id/instance/cmdclass than its own. More precisely, state changes happening after explicit calls to the API are notified normally, while state changes happening when manually pushing this switch get notified with these other values. So I implemented a set of “alternate” values to look for, as a hackish workaround to cover both remotely-triggered and locally/physically-triggered changes in this wallswitch.
Since Z-way protocol is largely asynchronous, an important trick is to check the time ordering of updateTime and invalidateTime fields within the received notification: this allows to discard notification for state changes that are not valid anymore, because an update of the device state is in progress.
toggle device state
When the user touches the icon for one of the devices, the widget provider gets notified, and launches a service intent, which will get processed the following way:
- get the current device state (this is required only because the code does not memorize any state)
- toggle the value
- perform an HTTP request to SET the new value on the device
- locally refresh the UI icon to reflect the new value (alternatively, one could wait for the next scheduled refresh to update it, but it is nicer to have immediate visual feedback)
Source code
The Android widget source code is available here.
Final integration
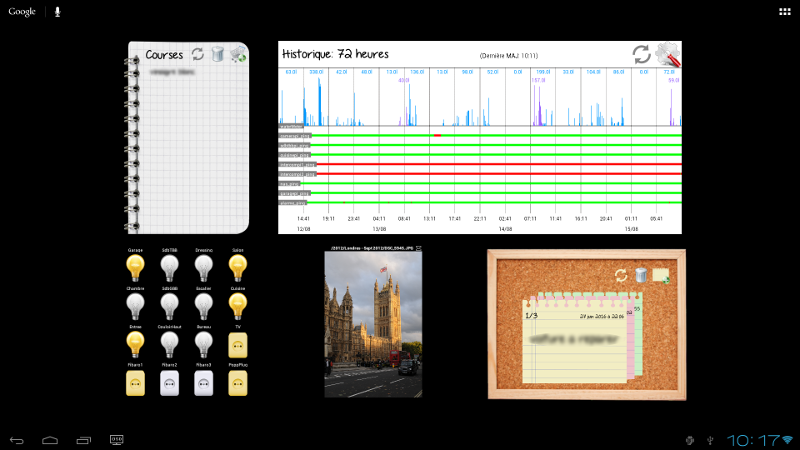
Here is a screenshot of the widget running, installed on my HomeHub tablet (that happens to have a black background)
Lessons learned
- Z-way web API is pretty convenient
- I definitely need to integrate more home automation information as homescreen widgets, this is so much more practical in day to day use than having to launch a dedicated application/URL.