
Photo Frame Android Widget
I wanted to have a very simple homescreen widget for displaying pictures, and soon came to the conclusion that every single such app on the Android store was either a huge overkill for this simple need, or looked suspicious, or buggy, or all of that at the same time. So I rolled my own.
Introduction
- I aimed for a minimalistic design: just a plain display of a photo, with no minimal associated UI/buttons, and an automatic refresh to display a new photo periodically. So the widget only has:
- the photo to be displayed. A user touch on it triggers the reload of a new photo.
- the display of the image path & name, which helps to remember where/when the photo is from when it is picked randomly from a set of 50.000+ images…
- a small email icon, to send the currently displayed image as an attachment.
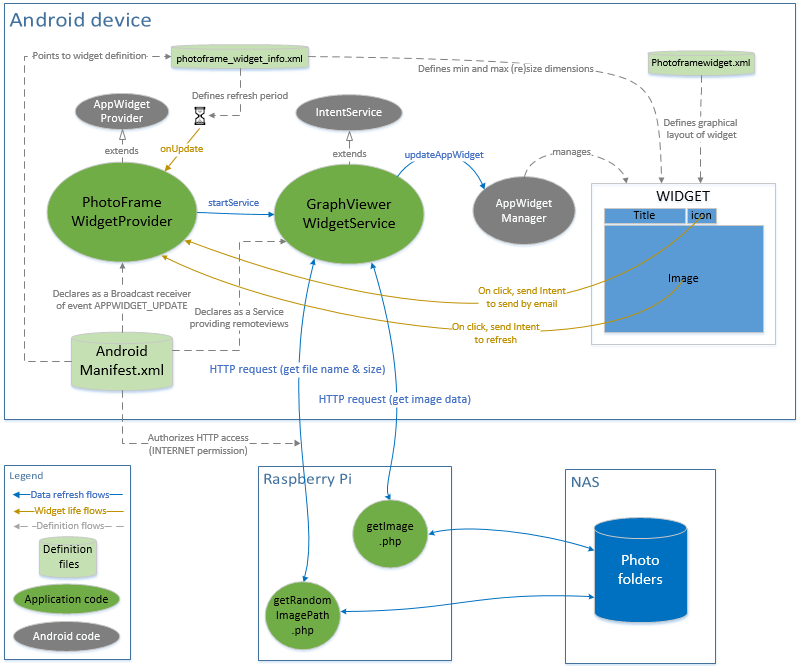
- Since I did not want to rely on any local storage, the source of the images is a remote shared folder on a NAS accessed via the local network.
Implementation
Server side
I happen to have a web server already running on a raspberry pi for oher purposes, so I just added two PHP files to handle the two HTTP requests described above.
getRandomImagePath
The purpose of this script is to randomly pick one image present somewhere under a specified base directory, and return its full path, its size, and the image orientation from the EXIF data.
Notes:
- I initially implemented a full recursive parsing of all subdirectories, but it does not scale well when the number of directories and images grows to a large value. Instead, to keep things fast, I randomly pick one of the top level subdirectories, then randomly pick one of the subdirectories inside it, and so on, until there is no further subdirectory. The only drawback is that any image present in a directory that also has subdirectories will be ignored:this is not a concern for me since my photo directory structure only has images in the leaf directories anyway.
- The base directory for the search happens to be a NAS shared directory in my case, but any directory path would do.
- error management in case of missing EXIF orientation data is done at client side.
- since I only have to send back three strings, I did not bother encoding them into a JSON structure, a single semi-colon-separated list of values sent back as a string does just fine.
getImage
This script takes as input the path of the image to be returned, and returns the image itself, wrapped in the appropriate HTTP header type depending on the image MIME format. The only trick here is the piece of code at the end of the script that ensures that no extra characters can be sent after image data bytes are sent by forcing the script to exit:
<?php
	...
	$fp = fopen($path, 'rb');

	// send the headers to tell receiver it is image data
	$image_mime = image_type_to_mime_type(exif_imagetype($path));
	header("Content-Type: ".$image_mime);
	header("Content-Length: " . filesize($path));

	fpassthru($fp);
	exit;
?>
Client side
The widget graphical layout consists of:
- a
LinearLayoutwith- a
RelativeLayoutcontaining aTextViewto display the image path & name, and anImageViewfor the email icon. - one
ImageViewto receive the bitmap
- a
- around this, a
RelativeLayoutcontaining the above layout and aProgressBar, that will be invisible by default, and made visible when loading is in progress. This way, the progress bar is layered on top of the rest of the widget
The AndroidManifest.xml contains the minimal setup required for a homescreen widget, and refers to the two main classes:
PhotoFrameWidgetProvider
PhotoFrameWidgetProvider class handles the APP_UPDATE events that are triggered every 30 minutes, delegating the refresh of the widget’s RemoteViews to the background PhotoFrameWidgetService. It also deals with the user intent to send the currently displayed photo as an email attachment.
PhotoFrameWidgetService
This service performs a first HTTP GET request on a remote server to get the name and size of an image picked randomly by the server, and then performs a second GET request to receive the image data itself. The received data (from a remote image file e.g. PNG, JPG, …) is decoded into a Bitmap, which is then set to fill the layout’s ImageView.
Notes:
- the reason of the two-pass approach is that knowing the image size in advance of receiving the image data allows to specify an appropriate subsampling factor. Otherwise, the decoding to a Bitmap would happen by default at the original resolution, which can take huge amounts of memory for large photos, that the android device might not be able to provide.
- therefore to be able to specify this subsampling, the
BitmapFactory::decodeResourceStreamthat is normally used to create bitmaps from local resources is used, passing along aBitmapFactory:Optionsobject with parameterinSampleSizeequal to the ratio of the original image size to the (much smaller) target rendered image size. - since even downsampled images might still be too big, we first check for available memory before decoding resampled image.
- the progress bar is initially invisible: whenever onUpdate is called, is becomes visible, and is made invisible again upon completion of the image reloading service execution.
- the orientation of the image (gathered from its EXIF data by the server) is taken into account to rotate it before display, so that it always shows heads-up.
- I also experimented with doing subsampling and rotation on server side to spare network bandwidth, but it turns out that in my case it was much slower than doing it on the client side (the server running on a raspberry pi model B).
Sending the photo as an email attachment boils down to sending an ACTION_SEND intent, with the content of the photo filled into the EXTRA_STREAM field. Whatever email client happens to be installed on the device will receive this intent and handle it.
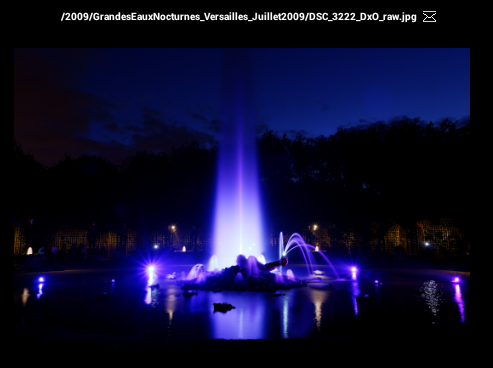
Result
Here is a screenshot of the widget running, installed on my HomeHub tablet (that happens to have a black background)
The Android widget source code and PHP scripts are available here.
Lessons learned
- The source code is quite small & simple, and suits my basic photo viewing need just fine.
- I have pretty poor PHP skills, but for such a simple matter the hacked scripts I came up with are enough (not that they are secure in anyway though)