
Charging & autobackup dock for Android devices
One day I got tired of the mess of plugs and cables required to charge the three android devices we have at home. I also realized that I had no regular-enough backup routine, which would turn out to be a big problem one day. The common solution is to buy a multi-devices charger dock, and install some fancy backup App on the devices themselves, that could perform regular backups over Wifi.
But I thought it would be fun to try and come up with a custom solution to plug all three devices on a single dock for nightly charging, and have it perform automatic backup of critical data behind the scenes, and not requiring wifi to be turned on or any specific app to be installed.
- Requirements
- Overview
- Disclaimer
- HW setup
- SW implementation
- Casing
- Casing, revisited
- Notes & Lessons learned
Requirements
So my target usecase dictates:
- ability to backup photos and contacts (all the rest I don’t really care about)
- no need for installing anything on the devices
- no need to root the devices
- no need to activate wifi on the devices
- minimal length of cabling between dock and devices
- ability to perform incremental backup
- ability to transfer backup data to NAS on local network
- a casing that looks good enough to stay at all times on the kitchen bar countertop where we usually plug our devices
Overview
My target setup is as follows:
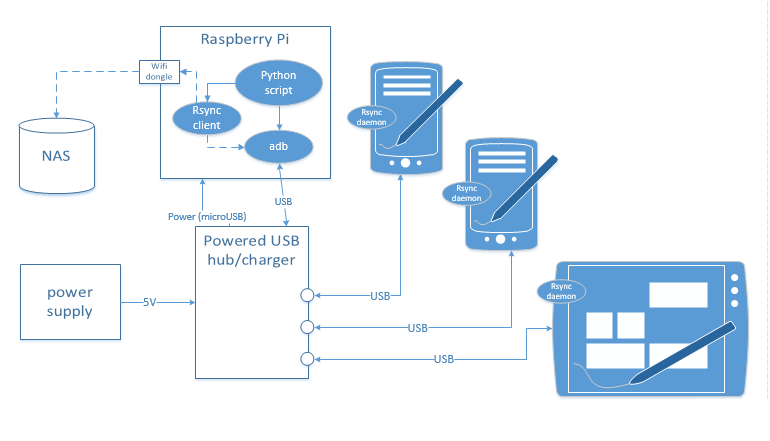
- Target devices will be charged by a powered USB hub/charger, that specifically supports high-power charging over USB.
- the Raspberry pi with its Wifi dongle is in charge of performing the backup over USB and sending data to the local NAS.
- a Python script wraps a set of
adbandrsynccommands to do the job.
Disclaimer
This setup relies extensively on adb tool, which itself requires USB debugging to be activated on the target devices, which is not acceptable if you have security concerns.
HW setup
Raspberry pi install
I used a Raspbian light image, but any distro will do.
Raspberry pi Wifi setup
On the pi, create the wifi config file:
sudo nano /etc/wpa_supplicant/wpa_supplicant.conf
And populate it with your wifi access point and password information:
network={
	ssid=”<wifi access point name>”
	psk=”<passphrase>”
}
then reboot.
NAS access setup
I mounted a shared directory from my local NAS by editing etc/fstab and adding the line:
192.168.0.12:/volume1/backup/smartphones /mnt/remotebackup nfs defaults,user,auto,noatime,nolock 0 0
USB Charger/Hub
Regular powered USB hubs only provide 500mA max per USB port, as per the USB specification. At this rate, it takes a long time to fully charge up a device, so I went for a powered USB hub that specifically provides charging capability, by providing ports compliant with the Battery Charging (BC) specification.
Also, since I want this hub to stay on permanently, I stayed away from cheapest models and bought a decent 4-port USB 2.0 model from Plugable. Here it is, providing power to the Pi through the USB cable on the right, and connected to one android device through the USB cable on the left.
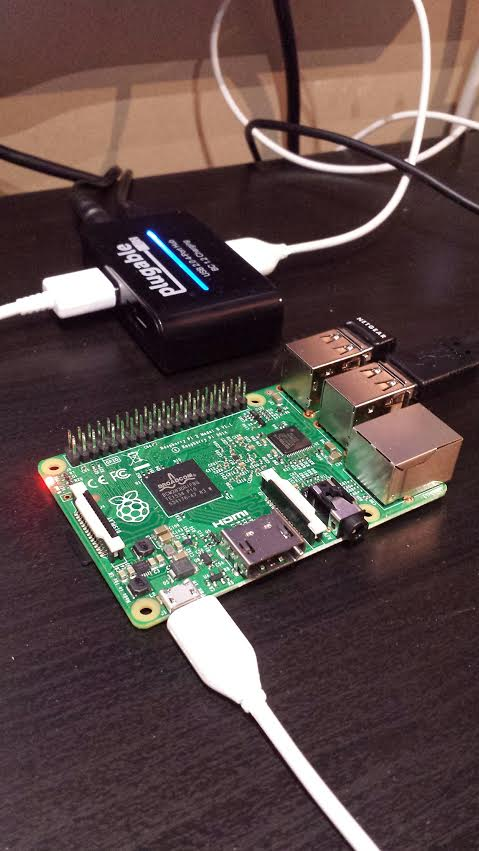
This 4-ports version will be just right to sync 3 devices + power the Pi.
SW implementation
Using ADB with multiple devices
Android Debug Bridge (adb) comes with the Android sdk, and is the cornerstone of command line debugging of a device connected over USB. I captured the instructions to compile it for Raspberry it here.
When working with multiple android devices plugged to the same USB host, the -s <deviceId> option needs to be added to specify which device the adb command is addressed to.
Note: originally, the android device will not be detected by adb until USB debugging is activated on the phone, AND communication between the PC and the phone is authorized by the user. See here for details.
Installing & starting Android rsync daemon
Since I want to perform an incremental backup only, I use rsync to only get new/modified files. To avoid having to install an rsync app on the device, I retrieved a binary version compiled for Android (here), and it gets pushed onto the device through adb.
- push android rsync binary to the device:
adb -s <deviceId> push rsync.bin /data/local/tmp/rsync - push rsync daemon config file to the device:
adb -s <deviceId> push rsyncd.conf /data/local/tmp - make the binary executable on the device:
adb -s <deviceId> shell chmod 755 /data/local/tmp/rsync - start the rsync daemon:
adb -s <deviceId> shell '/data/local/tmp/rsync --daemon --config=/data/local/tmp/rsyncd.conf --log-file=/data/local/tmp/rsync.log; sleep 1'
Credits go to this guy for these steps.
Unlocking
Some of the next steps will require the device to be unlocked. I happen to use a passcode lock, and using adb remotely unlocking boils down to using:
adb shell input text <passcode>
Note: if the device was locked with a pattern, one could use
adb shell input swipe <...>
instead.
Note: I was not able to find a robust way to determine through adb if device is locked and requires unlocking or not….
Also, all of this works only if screen responds to user interaction, i.e. is turned on. I determine screen status with :
adb shell dumpsys input_method | grep 'mScreenOn|mInteractive'
and then turn it on if needed by simulating the POWER button:
adb shell input keyevent 26
Backup Photos
adb allows to get any user-accessible file on the device. Since photos are available by default in a visible/accessible folder, getting them is easy. An appropriate target backup folder is created on the NAS and then a local rsync client is launched on the raspberry pi to copy them:
rsync -az rsync://localhost:6010/root/sdcard/DCIM/Camera <NAS directory>
Backup Contacts
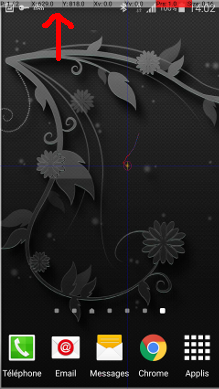
For Contacts, things get much more difficult. Different Android versions use different locations for the Contacts database, which is not accessible externally on a non-rooted device anyway. I also happen to use multiple Google accounts on the same device, which makes things more complex. The most simple and robust way I found to get ALL contact information is to use the Contacts app itself to export the contacts to a single file on the SD card, and then get this file through adb. This is quite straightforward to do manually, but much harder to automate. But not to worry, adb provides the ability to simulate user taps on the screen, so we just have to note the coordinates of the appropriate touch points and replay them later.
To figure out what the touch coordinates should be, there is a nice option in the Developer options menu to display an overlay with X and Y coordinates whenever user touches the screen:
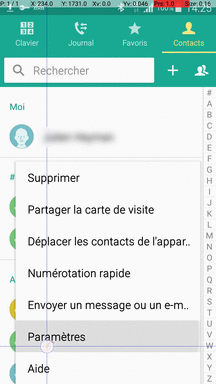
Once a list of manual touch points is available, the first step is to remotely launch the Contacts app:
adb shell am start -n com.android.contacts/com.android.contacts.DialtactsContactsEntryActivity
Then simulate the user pressing the MENU button:
adb shell input keyevent 82
And then use the predefined list of user touch points, to make a series of adb shell input tap <x> <y> calls to simulate the user actions:
The only catch here is that obviously, touch coordinates will not be the same between two devices, and depends on whether the device is in portrait or landscape orientation at the time of execution. To address this, I stored different lists of touch points for each device to be sync’ed, and for both portrait and landscape configurations. To figure out at runtime the device orientation, I used:
adb shell dumpsys input | grep -i SurfaceOrientation
Depending on the device’s menu layout, sometimes the menu entry to be clicked on is not visible on the screen, and a swipe gesture is needed to bring it in view. This can be just as easily done with the command adb shell input swipe <x1> <y2> <x2> <y2> <swipe_duration>.
Once these remote operations are complete, a Contacts.vcf has been created on the SD card and can be retrieved with:
adb pull <contacts.vcf filepath> <backup destination>
Scripting it all
The python script that sequences everything, reads params from a config file, and provides logging capability is archived here, along with the associated rsync binary and config file.
The script is called every night at 3am by adding the following line to the Pi’s crontab:
0 3 * * * /home/pi/androidbackup/androidbackup.py
Casing
I initially thought of designing and 3D-printing a custom dock, but stumbled upon this bamboo box that is originally designed to tidy up phone chargers/cables. It happens to be just the size I was aiming for, and looks much nicer/cleaner than anything I would have 3D-printed
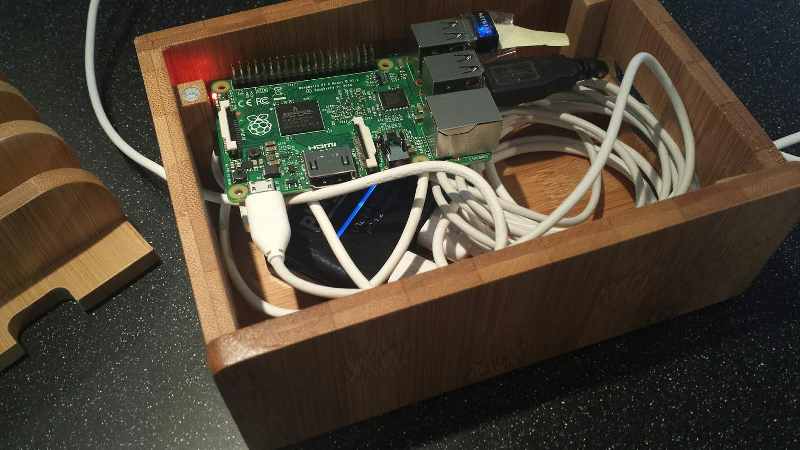
It is still a big mess of USB cables in there, so I ordered shorter USB cables which should improve this.

There you go, no more dangling cables, and under its inconspicuous look it wakes up at 3am every night to take care of my precious photos & contacts.
Casing, revisited
I later bought a CNC, which was a good opportunity to redo a custom wood casing (see here if interested), in a completely different form factor, and customized for our three devices:
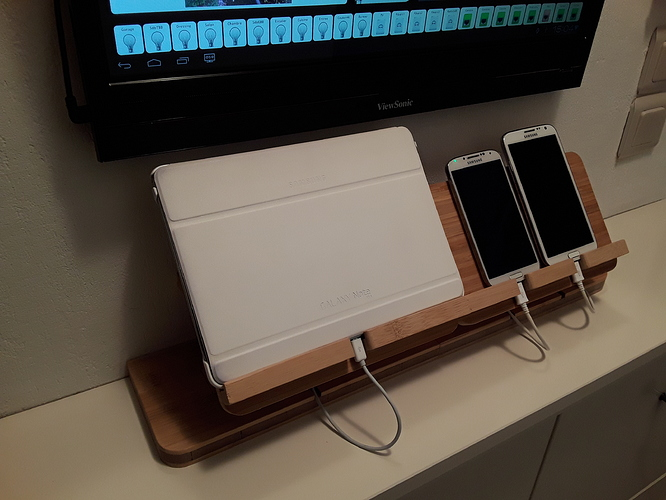
It has been sitting there in the hallway for a couple of years now, and faithfully charges and backups our gizmos. And the beauty of CNC is, if someday we get a new phone that won’t fit, just adapt the design and re-cut a fresh one !
Notes & Lessons learned
adbis quite a very versatile tool.- It would be good to find a solution that does not require USB debugging to stay activated. But given the list of requirements I tried to stick to, I do not see any obvious alternative.
- there are plenty of steps in the set of adb commands used here that will potentially be broken over time with future versions of android. Hopefully the script updates to keep things up and running should not be too hard.