
Standalone Arduino-compatible circuits
Using a regular arduino board is great for quick prototyping. However, for some projects it is not always desirable to embed a full-fledged arduino board in the final setup, for example due to space/weight constraints, or maybe just because you don’t want to buy a new Arduino board for each new project. In such cases one can design a custom circuit board integrating only the core of the arduino board: the ATmega microcontroller. The chip alone (for example, the ATmega328 found on the old entry-level arduinos) only costs a few dollars, versus about 30 dollars for an actual Arduino board. It can even be bought pre-burnt with the arduino bootloader.
Standalone arduino-style circuit
I am usually starting from this minimal hardware setup that will correctly run Arduino programs:
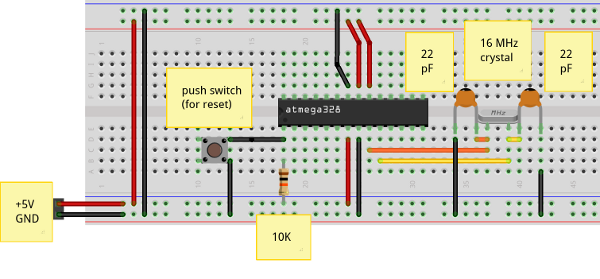
and then add the other project components/connectors as appropriate.
Pinout
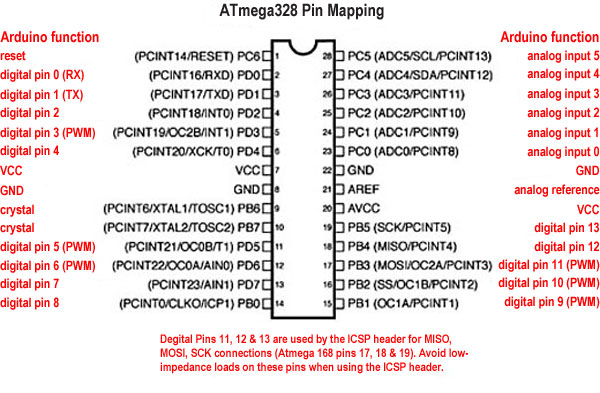
One consequence of using a standalone ATmega chip instead of an actual Arduino board, is that pin names are different. The mapping is show below:
Programming a standalone ATmega chip
When using a regular arduino board, the programming of the chip just boils down to plugging the USB cable to a PC, and using the arduino IDE to send the binary into the chip. With a standalone design however, programming the chip is a bit less simple. Here are a few options:
- Use a regular Arduino board, unplug the original Atmega chip, plug the new chip to be programmed, use the IDE as usual, then switch the original chip back in place. This is the easiest, but is a bit tedious and hazardous (unplugging/replugging the chip is an opportunity to bend a pin or something…)
- Use a regular Arduino board as a programmer. The arduino site has a dedicated page with all the information.
- Use an FTDI programmer, and connect the few required pins directly on the standalone circuit:
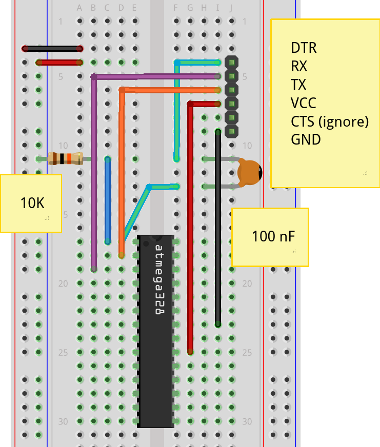
A cheap way to build such an FTDI programmer is described here