
Shopping Tracker Android app
Overview
You know how role-playing games have a main quest, secondary quests, and tens of side quests ? Well this projet is of the latter kind, a short detour from the other significant project I was working on at the time. The purpose of this very simple app is to implement a shopping budget tracker, I am sure hundreds of similar apps exist but as usual rolling my own custom one was the whole point, and the interest I had was not in the app itself but more in the implementation details.
Features:
- (re)set a total shopping budget
- keep track of the list of actual expenses and planned expenses
- have the ability to either confirm planned expenses or cancel them
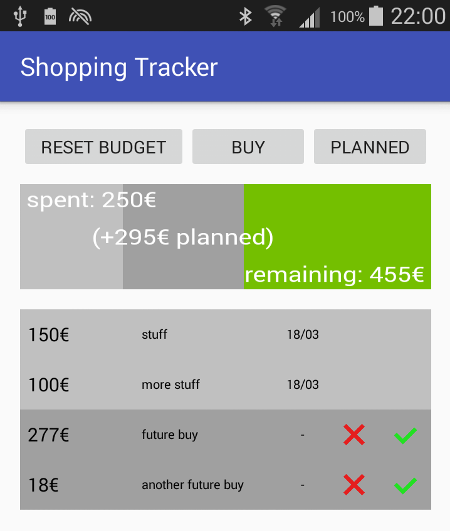
- Display graphically the remaining budget, taking into account actual expenses and future expenses.
The app ended up looking like this:
Implementation
App architecture
The bulk of the implementation is very basic:
- a UI layout containing :
- Three
Buttonviews to reset budget/register an expense/plan an expense - an
ImageViewto render the current status in a horizontal bar form - a
ListViewto keep track of past and future expenses
- Three
- a
MainActivityclass:- manages user actions
- keeps track of total/remaining/spent/planned expenses
- renders the graphical status into an
ImageView - saves/restores user data when app is closed/destroyed.
- a
ListRowItemclass holds data for one line in theListView - a
ListAdapterclass is in charge of populating theListViewbased on a list ofListRowItemobjects, rendered using a specific row views layout- a
TextViewfor the amount - a
TextViewfor the (optional) expense description - a
TextViewfor the expense date - a
ImageViewfor the Cancel icon - a
ImageViewfor the Confirm icon
- a
![]()
The noteworthy implementation details are described below.
Status bar rendering
The spent/planned/remaining amounts are rendered as three segments in a horizontal bar. Nothing fancy about the implementation, the only trick is to figure out the width/height of the ImageView as rendered on the screen. A robust way to do this is by registering a callback on the global layout engine:
    // Implement hook on global layout completion, to get valid view sizes
    final ImageView BudgetIV = (ImageView)findViewById(R.id.budgetRemainingView);
    ViewTreeObserver viewTreeObserver = BudgetIV.getViewTreeObserver();
    if (viewTreeObserver.isAlive()) {
        viewTreeObserver.addOnGlobalLayoutListener(new ViewTreeObserver.OnGlobalLayoutListener() {
            @Override
            public void onGlobalLayout() {
                BudgetIV.getViewTreeObserver().removeOnGlobalLayoutListener(this);
                viewWidth = BudgetIV.getWidth();
                viewHeight = BudgetIV.getHeight();
                refreshBudgetView();
            }
        });
    }
Since this is called once the UI views have actually been layed out on the screen, calling getWidth and getHeight inside this callback is guaranteed to return adequate values (while calling those functions at other times may return 0 due to the views not being rendered yet, as is typically the case when still inside onCreate function !)
Once the dimensions are known, the MainActivity renders three rectangles and three pieces of text into a Bitmap using Canvas of these dimentions, adjusting the color of the remaining part as it decreases:


Click handlers inside ListView rows
When using a ListView, it is often useful to register a click handler on each row of the list, to trig a specific action.
In this case, each listview row contains three TextView (amount/description/date), and two ImageView (confirm & cancel icons). So I needed to have multiple click handlers for each row: one for the confirm icon, and one for the cancel icon.
The simplest way I found was to register click handlers inside the ListAdapter class getView function, that send a specific Broadcast event to the MainActivity
public View getView(int position, View convertView, ViewGroup parent) {

    [...]

    final int pos = position;
    holder.confirmIcon.setOnClickListener(new View.OnClickListener()
    {
        @Override
        public void onClick(View v)
        {

            final Bundle extras = new Bundle();
            Intent doneIntent = new Intent();
            doneIntent.setAction(MainActivity.CONFIRMITEM_ACTION);
            extras.putInt(MainActivity.EXTRA_ITEM_POSITION, pos);
            doneIntent.putExtras(extras);
            doneIntent.addCategory(Intent.CATEGORY_DEFAULT);
            v.getContext().sendBroadcast(doneIntent);
        }

    });

    holder.cancelIcon.setOnClickListener(new View.OnClickListener()
    {
        @Override
        public void onClick(View v)
        {

            final Bundle extras = new Bundle();
            Intent doneIntent = new Intent();
            doneIntent.setAction(MainActivity.CANCELITEM_ACTION);
            extras.putInt(MainActivity.EXTRA_ITEM_POSITION, pos);
            doneIntent.putExtras(extras);
            doneIntent.addCategory(Intent.CATEGORY_DEFAULT);
            v.getContext().sendBroadcast(doneIntent);
            Log.i("", "CANCel");
        }

    });
This way, each icon has its own click handler, and the list adapter does not have to care about what happens when the user clicks the button: this is implemented in the main activity, as it should be. Also, other parts of the row do not respond to click.
User data input pop-up
When the user clicks either the “Reset” or “Buy” or “Planned” buttons, a pop-up window is opened to gather user inputs. I used to implement this by starting dedicated Activities, with their own layout XML files. But I realized there is a much simpler way which is to create a custom AlertDialog dynamically, using the AlertDialog.Builder utility class. Taking the example of the pop-up dialog registered to the “Buy” button, the steps are:
    Button shopButton = (Button)findViewById(R.id.shopButton);
    shopButton.setOnClickListener(new View.OnClickListener() {
        public void onClick(View v) {
First create a dialog using the AlertDialog.Builder:
        AlertDialog.Builder alert = new AlertDialog.Builder(MainActivity.this);
        alert.setCancelable(false);
        final AlertDialog dialog;
Dynamically create the dialog view Layout
        LinearLayout layout = new LinearLayout(MainActivity.this);
        layout.setOrientation(LinearLayout.VERTICAL);
For fields used to input values/amounts, force numerical keyboard only (this allows to spare checking if the input does not contain letter, special caracters, etc…):
        final EditText amountBox = new EditText(MainActivity.this);
        amountBox.setInputType(InputType.TYPE_CLASS_NUMBER);
Add the two TextView object to the dialog layout, customizing the hint text displayed when the field is empty
        amountBox.setHint(getResources().getString(R.string.amount_input_text));
        layout.addView(amountBox);

        final EditText itemNameBox = new EditText(MainActivity.this);
        itemNameBox.setHint(getResources().getString(R.string.name_input_text));
        layout.addView(itemNameBox);

        alert.setView(layout);
Configure the click handlers for “Ok” and “Cancel” buttons: since we want to perform input field validation while the pop-up is opened, the “Ok” click handler does nothing, a custom handler is used later, see further down.
        alert.setPositiveButton("Ok", new DialogInterface.OnClickListener() {
            public void onClick(DialogInterface dialog, int whichButton) {
                // Do nothing intentionally: this is to allow a specific click handler
                // that will perform checks on the values and keep the dialog open if needed.
            }
        });

        alert.setNegativeButton("Cancel", null);
        dialog = alert.create();
Make the virtual keyboard show up automatically without user having to click the first input field:
dialog.getWindow().setSoftInputMode(WindowManager.LayoutParams.SOFT_INPUT_STATE_VISIBLE);
Pop-up the dialog to user:
dialog.show();
Implement the custom “Ok” button click handler, that validates the amount input field and prevents user from submitting an incorrect value (empty or 0):
        // Register the click listener on the OK button, that will CHECK entered values before accepting to close.
        dialog.getButton(AlertDialog.BUTTON_POSITIVE).setOnClickListener(new View.OnClickListener()
        {
            @Override
            public void onClick(View v)
            {
                userValueSpent = amountBox.getText().toString();
                if (!userValueSpent.equals("")) {

                    userItemDescription = itemNameBox.getText().toString();
                    int value = Integer.valueOf(userValueSpent);

                    if (value > 0) {
                        remainingBudget = remainingBudget - value;
                        spentBudget = spentBudget + Integer.valueOf(userValueSpent);
                        refreshBudgetView();

                        SimpleDateFormat sdf = new SimpleDateFormat("dd/MM");
                        sdf.setTimeZone(TimeZone.getDefault());
                        String date = sdf.format(new Date());
                        ListRowItem lri = new ListRowItem(Integer.valueOf(userValueSpent), userItemDescription, date, true);
                        addPurchase(lri);

                        dialog.dismiss();
                    }
                    else
                        Toast.makeText(v.getContext(), v.getContext().getResources().getString(R.string.wrong_amount_text), Toast.LENGTH_SHORT).show();
                }
                else
                    Toast.makeText(v.getContext(), v.getContext().getResources().getString(R.string.empty_amount_text), Toast.LENGTH_SHORT).show();
            }
        });
        }
    });
The pop-up looks like this:
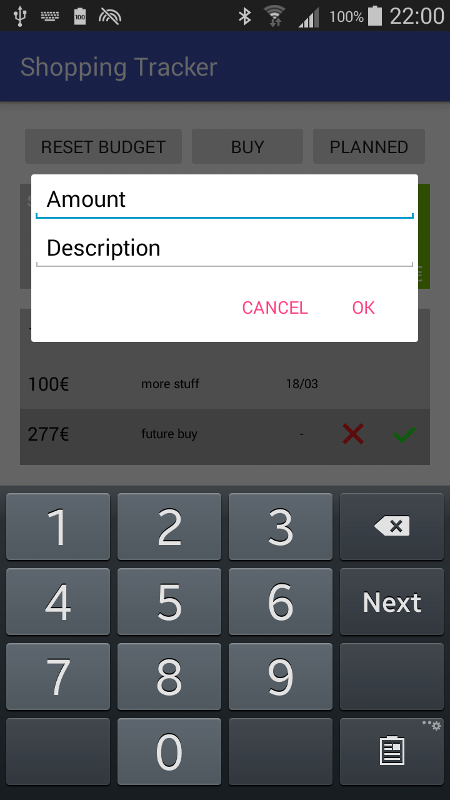
The Amountfield is selected by default and the virtual keyboard shows up automatically. When the user then focuses on the (optional) Description field, the virtual keyboard adjusts automatically to show full alphanumeric setup.
Saving/restoring data
To preserve data when the app is not active, all information is saved into SharedPreferences entries whenever the app is paused or destroyed. These data are restored in the onCreate method.
One specific point here is that SharedPreferences is not intended to store lots of data, and any significant amount of app data should ideally be in a database. However, considering the very limited set of data that this app manipulates (a few values for total/spent/planned/remaining amounts, and the few entries in the expense list), I wanted to avoid having to implement code for an SQL database just for a few list entries. So I stored them in the SharedPreferences along with the rest, by serializing the content of the list into a string, and deserializing it when the app is restored. It may not be very nice, but does the job and significantly limits the amount of code.
Hide/Show icons
The ListView rows are all based on the same view layout, but the confirm/cancel buttons only make sense for the planned expenses, not for the actual/past expenses. So, for the rows containing actual expenses, the two buttons must be hidden. The usual way to do this is by calling setVisibility() on the corresponding ImageView, however setting a View to INVISIBLE also removes it from the layout, which then re-arranges dynamically: sometimes this is the intended behavior, but here it just ended up mis-aligning the views between rows that had the buttons, and rows that didn’t. Instead of making the ImageView objects invisible, I chose to set their content to a blank/transparent content of the same size: this way the layout geometry is not impacted.
![]()
Source code
The code is available here