
Homehub redux, MagicMirror edition
Table of contents
- Table of contents
- Introduction
- Overview
- MagicMirror2 framework
- Installing MagicMirror2
- Modules
- Custom module development
- Module debugging
- Custom modules
- Power management / User presence detection
- Automating MagicMirror startup
- Source code
- Useful links
- Lessons learned
- Todo list
Introduction
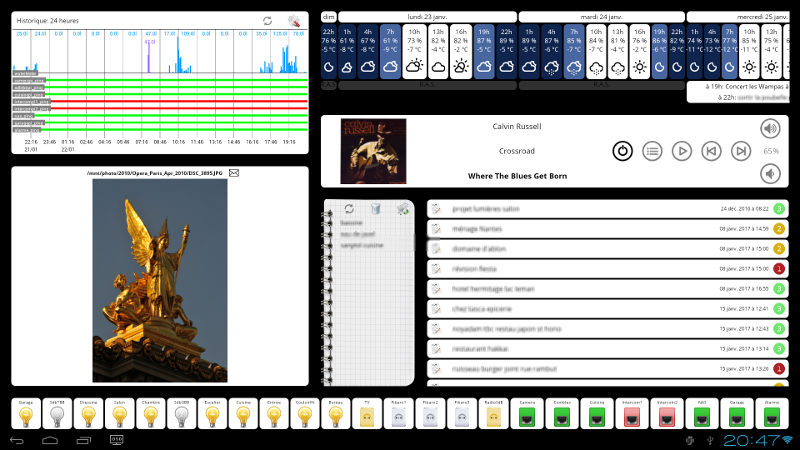
I had been using an all-in-one touchscreen display running Android for a long time as a home hub to display pictures, keep track of thing to do, control music,etc…:
It was all based on a custom Android application, which was interesting to implement but also a LOT of work at the time. Learning Android development and having to navigate through its oddities is not a good memory…
Anyway, flash forward a few years later and I realized that I kept having annoying intermittent issues with it:
- the wifi module integrated in the display had a tendency to drop the connection every now and then.
- the integrated CPU had always been a little underpowered, but after a few years of the file system aging, it became slower and slower.
- the proximity-sensor-based wake-up mechanism I had installed turned out not to be 100% efficient, due to the limited robustness of the internal Android system. More on this below.
Also, I realized that over time I stopped using/caring about half of the features I had programmed in. It was time for restarting from scratch!
The key things I wanted to do this time around were:
- reuse the touchscreen display (trusty old ViewSonic VS220) itself: nothing wrong with it, and a 22” touchscreen is not so cheap.
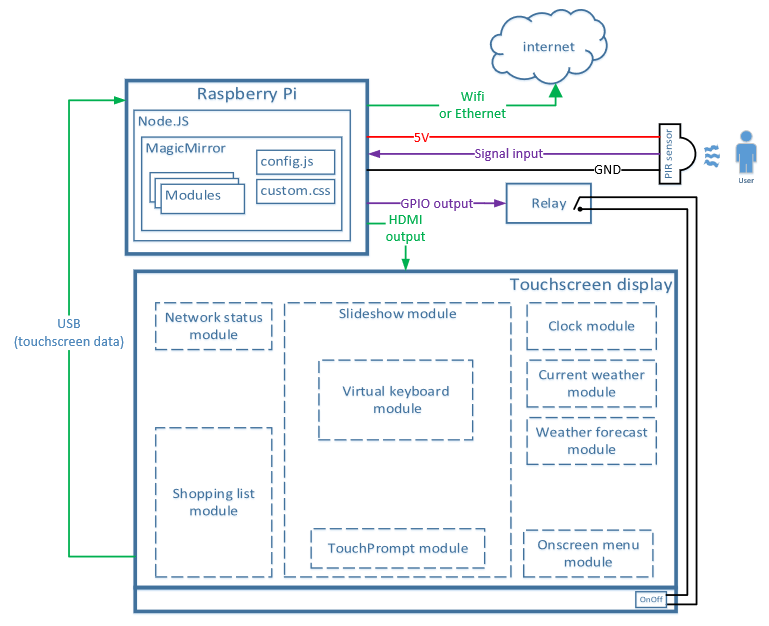
- NOT use the sluggish integrated CPU & Android system. Fortunately, this all-in-one touchscreen has an external micro-HDMI input, so I figured I would buy a Raspberry Pi4, and use that, bypassing the internal CPU.
- clean-up the interface to only keep the features I found myself ACTUALLY using everyday.
- find a 100% robust way to put the display to sleep (for power saving) and back on, without any side effects.
Overview
I considered using Kivy since I like using Python on Raspberry Pi (who doesn’t), but while browsing around I stumbled upon MagicMirror2, and it soon struck me as the ideal solution. Originally, it’s the go-to solution to implement…well magic mirrors, i.e. displays hidden behind two-way mirrors that people install in their hallway or bathroom, to show information through the mirror. Thousands of people have made their own, it’s a great project that is very accessible to non-programmers, and looks cool.
I had no interest in the “mirror” part of it though, and I really, really needed to keep the touch functionality. While doable with a two-way mirror and IR touch frame, it was not what I needed, and who wants fingerprints all over their mirror anyway? Still, MagicMirror turned out to be a wonderfully simple framework to use, and with some tweaks to leverage the touch feature of the display, it got me exactly what I needed.
My project ended up being like this:
- on the touchscreen display itself, I kept only the features I really wanted:
- a large area covering most of the screen to show pictures, to act as a photoframe/slideshow
- clock & weather info, as is very typical on such a display.
- a shopping list, with support for adding items using the touchscreen.
- a touch menu in the bottom right corner to access miscellaneous actions that don’t need to be shown by default.
- and a network devices status monitor in the top left corner just because…I needed something to fill that part, and it would tell me when one of my (many) raspberry Pis would be down.
- A Raspberry Pi 4 runs MagicMirror and has its HDMI output connected to the display, as well as a USB connection that allows it to read touch events. It grabs data from the internet (e.g. weather) as well as pictures from a local NAS, and shopping list items from a local server.
- A passive infrared sensor (PIR) module is used to detect user presence in the vicinity of the display, triggers a signal to the Pi, which in turn will activate a relay to turn the display on and off (more on this below).
MagicMirror2 framework
The documentation is available here, but here’s my simplified view of it:
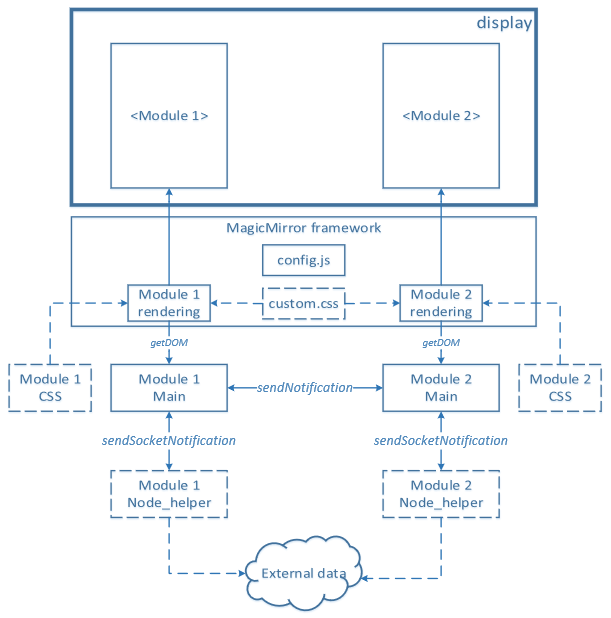
- the MagicMirror (MM) framework does all the heavy lifting to render the final image to be displayed.
- it’s based on “modules” that each contribute to filling one region of the display.
- MM has one central configuration file (config.js) where one defines which modules are to be included, and which region of the display they are assigned to.
- Each module contains code to generate the visual elements to be rendered in its associated region. In practice, each module implements a
getDOMfunction that returns a block of HTML to be rendered. - Each module has a main file containing at least the
getDOMcode (to display things), and optionnally has an associatednode_helperthat handles data retrieval or any utility function that the module may need. - Each module has an optional CSS (Cascading Style Sheet) file to customize the way its associated HTML will be rendered.
- MM also has a global
custom.cssstylesheet that can be used to override the default rendering options, for all modules. - Inside a module, the main part and the node_helper part (when present) can send data to each other using “socket notifications”.
- Modules can send data to each other using “notifications”.
What appealed to me is that…this is pretty much all there is to it. No complex framework API, no fancy design patterns that you have to navigate your way through (I’m looking at you Android!), you just have to know about these few elements and you’re done. Actually, you don’t even have to know about all this if you don’t intend on developing custom modules, reading a short overview of config.js would be enough to use existing modules.
Node.js / javascript
MagicMirror is based on the Node.js framework, which is the extremely popular way to use Javascript/ECMAScript on the server side (rather than its original use in browsers/client-side). I must admit, this is the ONE thing that had me hesitating initially, as I generally don’t like using “web” technologies, had no previous knowledge about Javascript, and as far as I could tell at the time it had a pretty bad rep as a hair-pulling programming language.
Anyway, I took a deep breath and proceeded to learn javascript, and while I am (obviously, after a couple of hours) still not good at it, I learned just enough to be able to do custom MM modules development (detailed below), and kinda liked the experience overall. I found this online book to be particularly helpful: Eloquent Javascript
Installing MagicMirror2
Preparing the Pi
I installed a vanilla Raspbian distribution on the Raspberry Pi 4, and just configured two things:
- disabled the overscan such as not to have black borders displayed:
sudo nano /boot/config.txt- add
disable_overscan=1
- Activated the
Wait for network at bootin Boot options during the initial confguration (raspi-config)- this ensures (among other things) that the Pi will wait until it has network connectivity before mounting mapped network drives, which I use in the slideshow module.
Installing MagicMirror
You should refer to the MagicMirror site/instructions, as I’m pretty sure that by the time you read this, the way to install MM on a Pi will have changed. I used a great one-liner/script to do everything:
bash -c "$(curl -sL https://raw.githubusercontent.com/sdetweil/MagicMirror_scripts/master/raspberry.sh)"
Adding modules
By default, MM has a short list of basic modules (clock, weather, agenda, news headlines, etc…) which already allow one to make a very useful display. But where MM really shines is in its third-party modules: virtually anything you can think of has already been developed by someone out there, so definitely do some searching before developing something. A list of the most popular 3rd-party modules is available, and there are many more beyond that: Google around and chances are you will find interesting modules.
The procedure to install a module is usually documented on the module’s github page, but in 99% of the cases it goes like this:
- navigate to the
modulessubdirectory in MagicMirror directory. - type
git clone {the module's github repo} - navigate to the newly created subdirectory named after the module, usually
MMM-{module name} - type
npm install(which will pull all necessary dependencies)
That’s it. Then proceed to declare the module in MM’s configuration file:
Configuration
MM looks into the config.js file under the config subdirectory to know which modules it must load, which parameter values they will use, and where to display them on the screen.
This configuration file uses JSON format (which goes hand in hand with Javascript), so you need to spend 5 minutes learning about that format. config.js includes a list named modules, you just need to add an entry to the list to include the module you want, the entry will look something like this:
module: "MMM-SomeModule",
position: "{name of the target region on the screen",
config: {
    ...{miscelaneous module-specific config params go here}...
}
The position parameter must be selected among the following predefined region names:
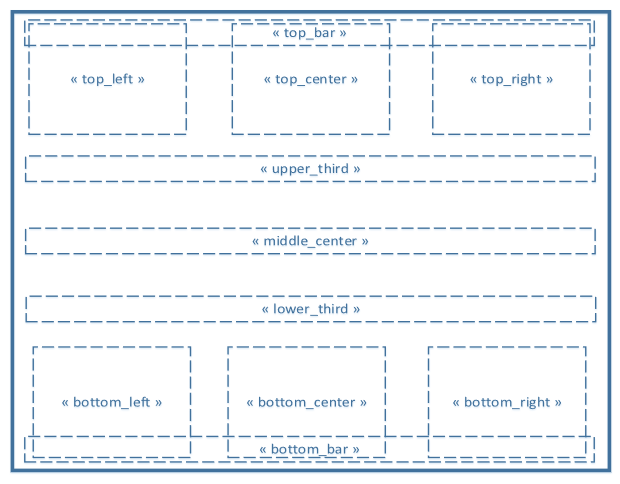
Modules
Clock, Weather, network status
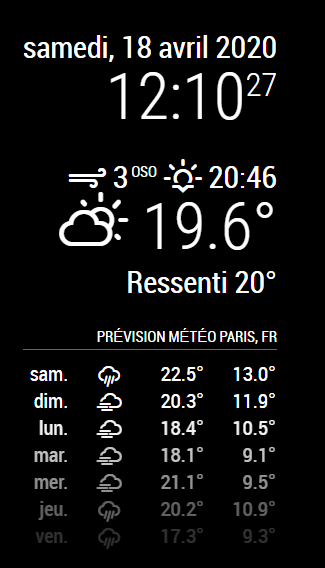
The clock, currentweather and weatherforecast modules come preinstalled, and they do exactly what you would expect.
For clock, I just adjusted the GPS coordinates to match my city (you can look them up by searching your city on Google map, they show up in the URL):
	{
		module: "clock",
		disabled: false,
		position: "top_right",
		displaySeconds: false,
		showSunTimes: true,
		lat: 48.8668619,
		lon: 2.1888326,
	},
For currentweather I simply adjusted the location (which will be displayed), the locationID for my city, and my personal appid from openweathermap.org. Same thing for the weatherforecast entry.
	{
		module: "currentweather",
		disabled: false,
		position: "top_right",
		config: {
			location: "Paris",
			locationID: "2968815",  //ID from http://bulk.openweathermap.org/sample/city.list.json.gz; unzip the gz file and find your city
			appid: "xxxxxxxxxxxxxxxxxxxxxxxxx"
		}
	},
These modules then show up like this on the screen :
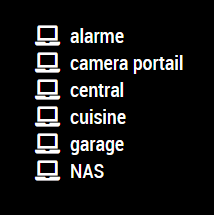
For the upper left part of the screen that hosts a connectivity status monitor for some of my home devices (most of them RPis), I installed and configured the MMM-NetworkScanner module. Pretty straightforward, I declared a list of IP addresses, and the icon to be displayed (the name for the icon must be one from the font-awesome list, check it out it’s great)
	{
		module: 'MMM-NetworkScanner',
		disabled: false,
		position: 'top_left',
		config: {
			devices: [
				{ ipAddress: "xxx.xxx.xxx.xxx", name: "NAS", icon: "laptop" },
				{ ipAddress: "xxx.xxx.xxx.xxx", name: "cuisine", icon: "laptop" },
				{ ipAddress: "xxx.xxx.xxx.xxx", name: "alarme", icon: "laptop" },
				{ ipAddress: "xxx.xxx.xxx.xxx", name: "camera portail", icon: "laptop" },
				{ ipAddress: "xxx.xxx.xxx.xxx", name: "central", icon: "laptop" },
				{ ipAddress: "xxx.xxx.xxx.xxx", name: "garage", icon: "laptop" },
			],
			showUnknown: false,
			showOffline: true,
			keepAlive: 120,
			updateInterval: 60
		}
	},
which results in this:
Custom module development
Now for the fun part: developing custom modules. I initially thought that it would be YET another learning curve that would take me down a rabbit hole, but it turned out to be surprisingly simple. I have to say, never has developing a plug-in/module/custom piece of work for a framework felt so simple, as it should be.
Code
There are several boilerplate examples out there, as well as excellent tutorials on the MM forum, but for the sake of this writeup, here’s a very short glance: the core of the module is the getDOM function, which should return a <div> HTML structure containing all the elements for that module. Creating a module that would consist in a single clickable button would be as simple as:
getDom: function() {
    this.container = document.createElement("div");
    var SomeButton = document.createElement("button");
    SomeButton.className = "myButton";
    SomeButton.innerText = "Button!";
    SomeButton.onclick = () => {
        ...for example send a notifcation here...
    };
    this.container.appendChild(SomeButton);
    return this.container;
}
Usually, the module should react to external notifications, and everything it takes is implementing the notificationReceived function:
notificationReceived: function(notification, payload, sender) {
    if (notification === "NOTIFICATION_XYZ") {
    	...do something useful here...
    }
}
If the module has an associated node_helper, it will listen to its incoming notifications by implementing socketNotificationReceived:
socketNotificationReceived: function(notification, payload) {
    if (notification === "SOME_NOTIFICATION_FROM_NODE_HELPER") {
        ...do something with data received from node_helper...
    };
}
Similarly, the node_helper code can boil down to just implementing the socketNotificationReceived function:
socketNotificationReceived: function(notification, payload) {
    if (notification === "GRAB_DATA_SOMEWHERE") {
     	...do the heavy lifting like getting data from the internet, and then send back this data using sendSocketNotification back to the main code...
    }
}
And…that’s it for the code mechanism. Obviously, the code in those functions can get arbitrarily complex, but I was surprised while reviewing code from many different third-party modules, that it often boiled down to just a couple of pages of code.
CSS
The other part of implementing a module is to take care of styling the HTML elements that getDOM returns. The same mechanism as for web pages is used, so it’s all a matter of learning just enough CSS to make the module look like it should. The CSS file for a module can have an arbitrary name, it’s the job of the main module to specify it by overriding the getStyles function:
getStyles: function() {
    return ["mymodule.css"];
}
Just looking at a few examples of CSS files for existing modules should get you up and running quickly.
Module debugging
So writing the module code is relatively easy, and one can usually start debugging it by adding traces in the code (console.log calls), but at some point, figuring out why it doesn’t behave as expected will be vastly more efficient if you have the right testing environment and tools. I am by no means up to date on the most relevant developer habits, but two things helped me immensely while debugging my MM modules:
- the ability to run MagicMirror in “server” mode, and using a browser on a different computer to run the client/display part, then leverage the browser’s integrated developer tools.
- using a javascript debugger.
Details below are nothing fancy, but I’m sharing them in case it helps other beginner MM developers.
Client-side debug: Serveronly mode & using Chrome developer tools
To support this the config.js must be modified to allow connection from an external IP address. You can white-list a number of specific IPs, but for development I got lazy and allowed them all:
ipWhitelist: [],
That’s bad, security-wise etc…you know the drill. The port to be used is configured on that line:
port: 8080,
In the MagicMirror directory, run node serveronly, MM will run the server part. From any browser you can then open:
http://[IP address of the Pi]:8080
and this will render your MagicMirror display in the browser rather than on the Pi’s display. And then the real magic: now that MM client code runs in a browser, you can use the developer tools that many browser integrate, to debug the JS code. In my case I used Chrome, you can open the developer tools pane from the Settings button => More tools => Developer tools.
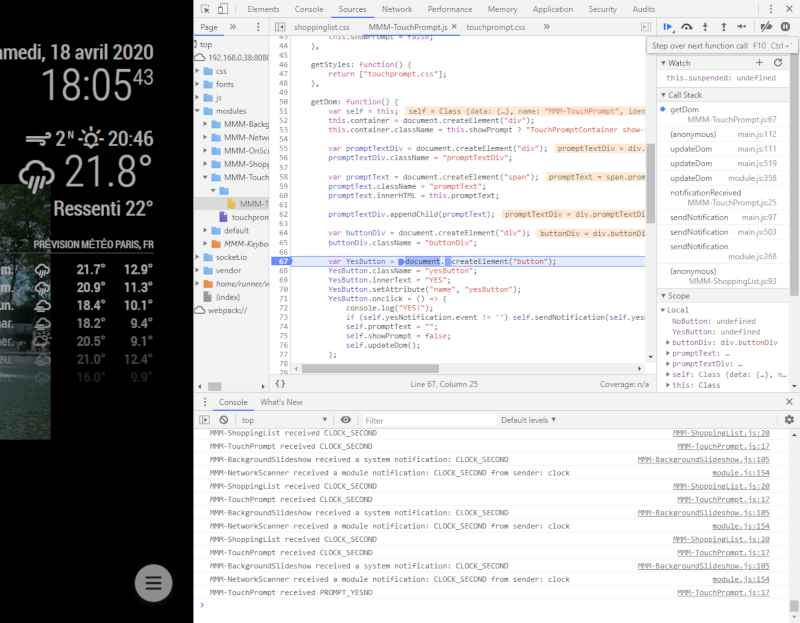
From there you can browse the code, browse the HTML elements of the page, and use the integrated debugger to set breakpoints and inspect variables. One of the other killer features in Chrome developer tools is the ability to inspect graphical elements, hovering over a given area in the page will highlight the associated element in the HTML tree:
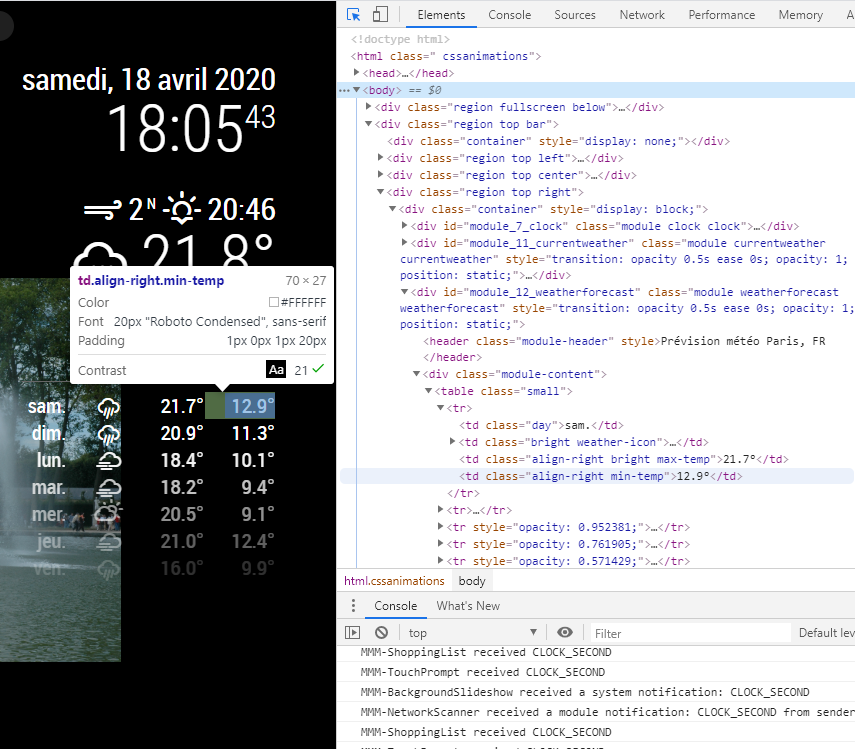
Very useful to go and check the attributes of a given <div> in a module, change its CSS attributes on the fly to test different options, etc…
Tip: while debugging a MM setup with a serveronly + remote browser, I found it helpful to show the mouse cursor, by adding the following to custom.css file:
Html {
    Cursor: default;
}
Server-side debug: Visual Studio Code
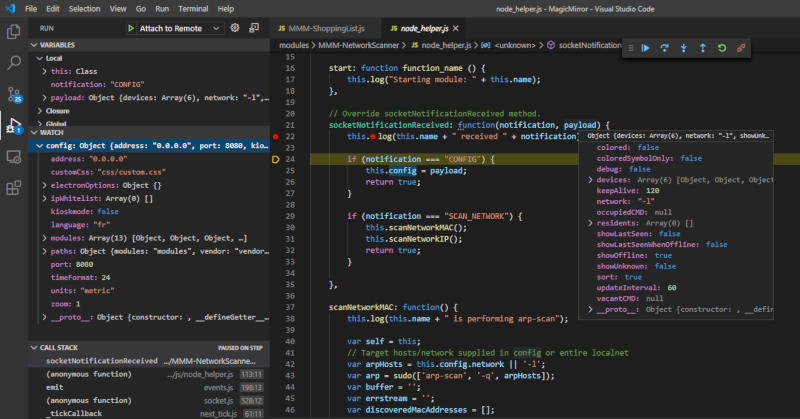
I had never tried Microsoft’s Visual Studio Code before, but since I stumbled upon a great set of instructions for debugging node applications that referred to it, I figured I would give it a try, and I’m very happy I did, it’s quite good.
After installing Samba on the RPi, sharing the local MagicMirror directory and mapping it from a Windows PC, it was then very convenient to edit the module code in VS Code, save and reload MM. And where things got really interesting, was using the javascript debugger in VS Code. It’s all described in the instructions I linked above, but basically it involves launching MagicMirror in a special mode where it will standby and wait for a debugger connection:
sudo node --inspect-brk=192.168.xxx.xxx:9229 serveronly
Then from VSCode, after having configured the debugger configuration with the Pi’s IP address, run the debugger and enjoy stepping through the server-side code, breakpoints, watching variables, etc…
Tracking config issues
If upon launching MM, you end up with a blank screen, chances are there is a syntax error in your config.js file. The following command, executed from inside the MagicMirror directory, may help tracking down where the error is:
npm run config:check
Note: I initially had to do npm install jshint for this to work
Logs
One thing that caught me originally, is that when running in serveronly + browser mode, the console.log traces show up in different places:
- the traces from node helpers will appear on the raspberry side in the console
- the traces from the module’s main code will appear in the browser’s developer tools console.
Tip: on the browser side, if you have the clock module, there will be CLOCK_SECOND traces every second, which is annoying. Just type “-CLOCK_SECOND” in the console filter box to filter them out !
Misc issues
For some reason I did not bother tracking down, my MMM-PIR-Sensor module gave me this error upon launch in serveronly+browser mode, while I did not have it in normal mode:
symbol lookup error: /home/pi/MagicMirror/modules/MMM-PIR-Sensor/node_modules/epoll/build/Release/epoll.node: undefined symbol: _ZN2v816FunctionTemplate3NewEPNS_7IsolateEPFvRKNS_20FunctionCallbackInfoINS_5ValueEEEENS_5LocalIS4_EENSA_INS_9SignatureEEEiNS_19ConstructorBehaviorE
Which required a rebuild of the module, by going into the MMM-PIR-Sensor directory and doing:
npm install electron-rebuild
node_modules/.bin/electron-rebuild
Custom modules
Below are some notes about modules I either customized (at code level) or developed.
Photoframe/slideshow module
This was the primary feature I wanted for my display: a slideshow that would pick one photo randomly from a predefined place (the NAS folder that contains all my pictures), and show it for a predefined time, before loading a new one. I found the MMM-BackgroundSlideShow module that did almost exactly that, and modified it to suit my needs:
-
the original module was implemented (at least at the time) to browse a predefined directory to return a list of images it contained, and then cycle through them in a sequence or in a random order. My problem was that this method does not scale up when the directory contains thousands of images, as mine does. So I modified the code such that each time the background image needs to be changed, it will go and search for (only) one image, walking the predefined directory recursively in a random manner, until it finds a suitable image (matching the list of allowed extensions), and return only that. The time to find and return that one picture is therefore almost independent from the total number of pictures. This strategy is implemented in the
getFilesfunction in thenode_helper. -
I did not like the picture taking the full width of the display, overlapping the modules on the sides. While there are features (gradient) to optimize the contrast between the background image and overlapping module text, for me it looked weird on some images that had a white background. So I reduced the display width by hacking the
custom.cssa bit with :
.region.below {
	width: 65%;
	margin: 0 auto;
	}
-
I added my own take on displaying a title over the top of the image: given how I organize my photos, they have a meaningless name (e.g. DSC45123.jpg) but there’s always a meaningful name on the directory they’re in. Except I never followed a very strict naming convention, and my directory names have no space in them, so I added a regular expression to make the containing directory name more appealing, e.g.
SomeDirWithPicsFromApril2004will be displayed asSome Dir With Pics From April 2004 -
the original module had the capability to configure a list of directories NOT to parse, but it was inconvenient for me to go and add a long list of subdirectories manually in the config file, and add more as I added pictures to my collection, so instead I added the ability to filter subdirectories from being used is a given string is found in their name. I use “NOSHOW_”, I just prefix my directories on the NAS with that keyword, and the slideshow will ignore them.

-
A feature I re-implemented from my previous homehub is the ability to send the currently displayed image as an attachment in an email. This turned out to be extremely simple: I imported the
jimpimage manipulation library to use itsresizefeature to generate an email-friendly copy of the image file to be sent, and then leveraged thenodemailerlibrary to create and send the associated email to a predefined list of recipients. A few lines of code and boom. -
While I was at it, I added the ability to go back to the previous image, for those cases when I would walk in front of the screen, and it would refresh right when I wanted to send it by email.
Since the original module already had the ability to change to the next picture, or pause, or resume, based on an external notification, and as I added a couple of actions myself, I went and looked for a module that would allow me to do that by touching buttons on the screen, and that’s how I ended up using the next module.
On-screen menu module
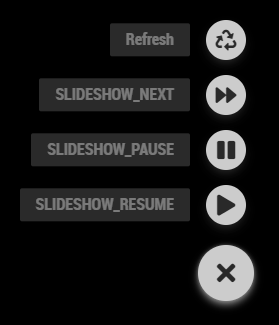
The very convenient MMM-OnScreenMenu module was exactly what I needed to be able to pause/resume/force a change in the slideshow/send the current image as an email. I only had to declare a suitable configuration:
	{
		module: 'MMM-OnScreenMenu',
		disabled: false,
		position: 'bottom_right',
		/* Valid positions: 'top_right', 'top_left', 'bottom_right', 'bottom_left' */
		config: {
			touchMode: true,
			enableKeyboard: false,
			menuItems: {
				refresh: { title: "Refresh", icon: "recycle", source: "LOCAL" },
				notify1: {
					title: "SLIDESHOW_NEXT",
					icon: "forward", /* from fontawesome.com list */
					notification: "BACKGROUNDSLIDESHOW_NEXT",
					payload: ""
				},
				notify2: {
					title: "SLIDESHOW_PAUSE",
					icon: "pause",/* from fontawesome.com list */
					notification: "BACKGROUNDSLIDESHOW_PAUSE",
					payload: ""
				},
				notify3: {
					title: "SLIDESHOW_RESUME",
					icon: "play",/* from fontawesome.com list */
					notification: "BACKGROUNDSLIDESHOW_PLAY",
					payload: ""
				},
				notify4: {
					title: "SLIDESHOW_PREVIOUS",
					icon: "step-backward",/* from fontawesome.com list */
					notification: "BACKGROUNDSLIDESHOW_PREVIOUS",
					payload: ""
				},
				notify5: {
					title: "SLIDESHOW_SEND_EMAIL",
					icon: "envelope",/* from fontawesome.com list */
					notification: "BACKGROUNDSLIDESHOW_SENDASEMAIL",
					payload: ""
				},
			},
		}
	},
- I activated the “touchMode” since this is what makes sense on a touchscreen
- I declared three user buttons, each of them programmed to send a specific notification to the slideshow module.
- I kept the “Refresh” button that comes as a default, because why not, it may help someday when the display misbehaves after a network issue.
By default, the on-screen menu is closed and does not take much space, on that lower right corner:

Touching it reveals the user actions, and once a user action has been touched, it automatically closes itself again. Neat.
Shopping list module
Next up was developing a module for my #2 priority for this display: displaying my shopping list and having to ability to add items to the list from the screen. There are MANY MagicMirror modules for a variety of todo/shopping list (Google, Todoist, etc…), but I don’t like to rely on an external service for such a simple thing, so years ago I implemented my own small shopping list server, and associated Android app. I’m still using the Android app on my phone, so I would just have to implement a MM module that interfaces to the existing server.
I went for a simplistic design:
- rendering the list items as HTML
<li>elements - just one button to add items (which invokes the next module I’m covering below: the virtual keyboard)
- I made the list items clickable, such that when I click on one of them, it prompts me whether I want to delete it (which involves yet another custom module, see below)
Basically the code boils down to:
var addItem = document.createElement("button");
addItem.className = "addItemButton";
addItem.innerText = "+";
addItem.setAttribute("name", "addItemButton");
addItem.onclick = () => {
    this.sendNotification("KEYBOARD", { key: keyboardInputID, style: "default"});
};
for the button, and :
function makeOnClickHandler(item) {
    return function() {
        self.sendNotification("PROMPT_YESNO", {text:"Delete "+ item +"?", yesNotification: {event: "DELETE_ITEM", payload: item}, noNotification: {event: '', payload: ''}});
    };
};

for (let i = 0; i < this.shoppingListItems.length; i++) {
    var listItem = document.createElement("li");
    listItem.className = "listItem";
    listItem.id = "listItem"+i+"_"+this.shoppingListItems[i].item;
    listItem.innerHTML = this.shoppingListItems[i].item;
    listItem.onclick = makeOnClickHandler(this.shoppingListItems[i].item);
    listContent.appendChild(listItem);
}
for adding the list items, which the node_helper retrieves from the remote server by:
getItems: function (url) {
    var self = this;
    request({ url: url, method: 'GET' }, function (error, response, body) {
        if (!error && response.statusCode == 200) {
            var json = JSON.parse(body);
            // Send the json data back with the url to distinguish it on the receiving part
            self.sendSocketNotification("MMM-ShoppingList_SHOPPINGLIST_ITEMS", json);
        }
    });
},
Really, I love how straightforward it is, compared to the hoops I had to jump through to get the same result in Android…anyway, it ended up looking like this:

Virtual keyboard module
To be able to add items to my shopping list, I absolutely needed to find a virtual/touch keyboard, or the whole thing would not make sense (yes, there are modules to input data remotely, but I did not want to have to grab my phone everytime I needed to add something while in front of my screen). A quick search led to the awesome MMM-Keyboard module which turned out to be perfect. It was still under development the first time I used it, but the developer reacted quickly and got it up and running in no time. Kudos @lavolp3!
The only small problem I had is that with the keyboard appearing over the photoframe/slideshow region, even though the keyboard was properly displayed on top, the touch events happening inside the slideshow area did not end up getting directed to the keyboard. I used an ugly but very efficient workaround, which was to force a very high Z-index on the region the keyboard was assigned to (lower left), by adding this to custom.css:
.region.bottom.left {
    z-index: 999;
}
When invoked (by sending it a specific notification), the keyboard is made visible:
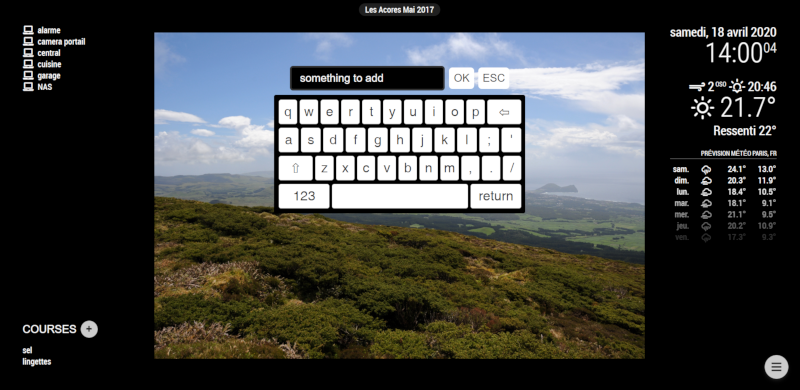
Upon touching “OK”, the content of the user input field is broadcasted as another notification in return, which the shopping list module catches.
TouchPrompt module
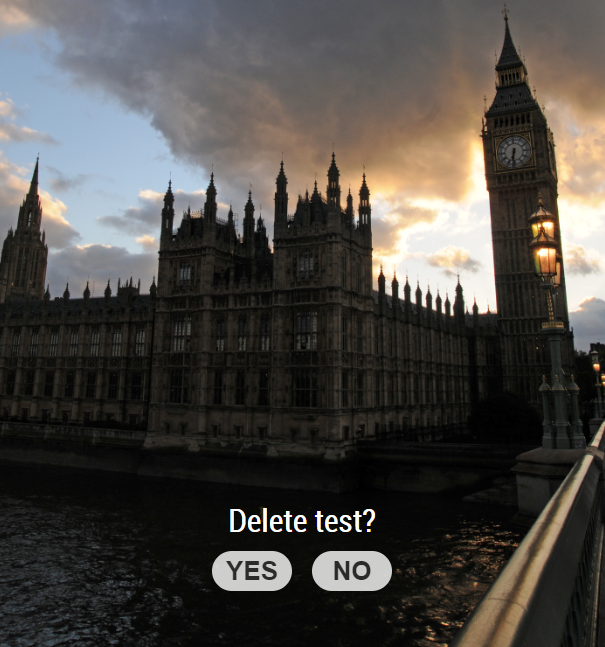
As I mentioned above, when I click on an item of the shopping list, it trigs an action to delete this item. But this would not work without a confirmation prompt, so I went on to implement a module to do just that: pop-up a prompt on request, with simple Yes/No buttons to confirm.
The code most boils down to :
var YesButton = document.createElement("button");
YesButton.className = "yesButton";
YesButton.innerText = "YES";
YesButton.setAttribute("name", "yesButton");
YesButton.onclick = () => {
    if (self.yesNotification.event != '') self.sendNotification(self.yesNotification.event, self.yesNotification.payload);
    self.promptText = "";
    self.showPrompt = false;
    self.updateDom();
};
(and similarly for the “No” button), the notification to be sent back is declared in the original notification from whichever module request the prompt. Finally a little CSS to style the buttons,
.MMM-TouchPrompt .yesButton {
	background-color: #fff;
	width: 80px;
	height: 40px;
	opacity: 0.8;
	border: 0px solid #00000000;
	border-radius: 20px;
	color: #333;
	font-size: 26px;
	font-weight: bolder;
	padding: 5px 5px;
	text-decoration: none;
	cursor: none;
	margin: 0px 10px;
}
And I got this:
Power management / User presence detection
A feature I had on my previous implementation of this project was to power off the screen when no one was present around it, to save power. By the way I measured the power consumption of my VSD220 display, it draws approximately 22W when it’s on, and <1W when switched off, so there’s value in having a power saving strategy.
I reused the PIR sensor approach I had already used in this project to detect user presence in front of the display.
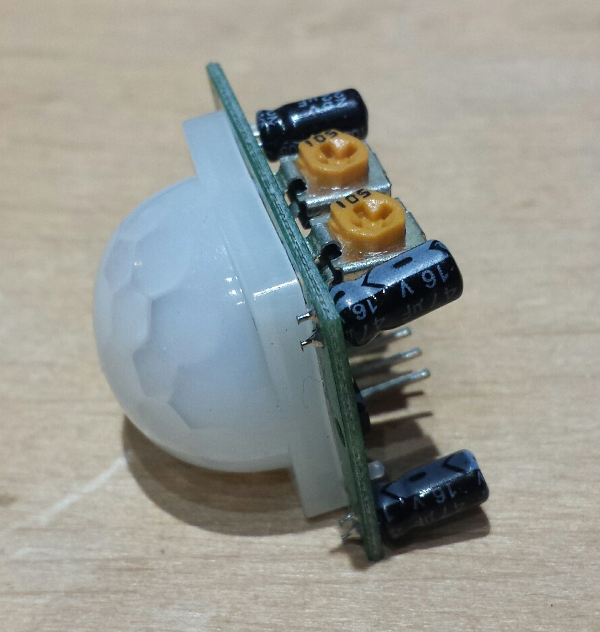
There’s a great MMM-PIR-Sensor module available that conveniently supports reading a PIR sensor signal off a GPIO, and broadcast a USER_PRESENCE notification accordingly, so I started there.
Now, I needed to switch on the monitor when user presence was detected, and switch it off when no user presence was detected anymore after a while. I initially tried to use MMM-PIR-Sensor’s integrated method for turning the RPi’s HDMI output on and off, unfortunately for some reason my (aging) VSD220 display did not quite manage the interruption of the HDMI signals so well, and turning the HDMI back on did not always result in the display resuming properly.
So I went for a more radical approach that I knew would work 100% reliably: hacking the physical on/off button of the front of the display:

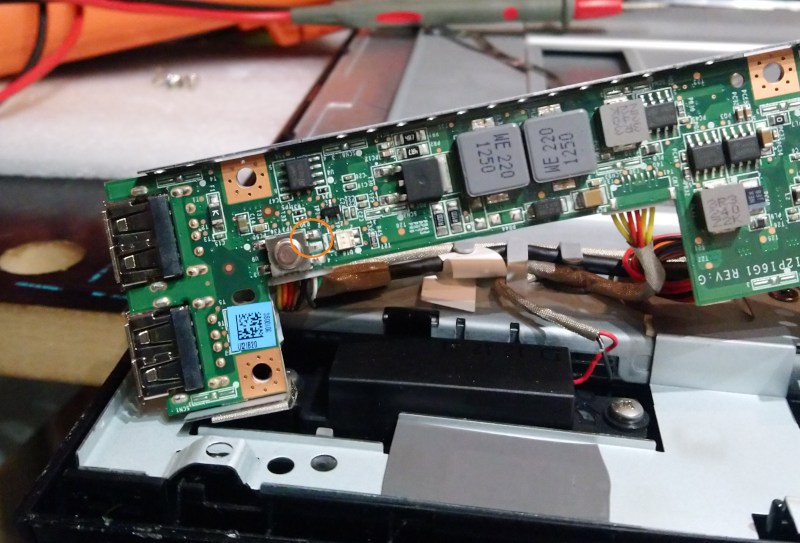
which required to open the plastic casing (nothing too difficult with a little patience, lots of clips to go through without breaking anything…), the on/off button is managed by the part in the bottom left:

Lifting that part revealed the on/off switch soldered on a PCB, so I just soldered two wires to those two pins of the switch:
And then put the PCB back in place, and ran the wires to where the display’s connectors are located in the back:

As I did not want to take any chances of an electrical interaction between the display and the Raspberry Pi’s GPIOs, I used a relay module to connect/disconnect the two wires (simulating the effect of pushing the physical button). So I proceeded to connect the PIR sensor and relay to the Pi, and on/off button wires to the two “NO” (normally open) pins on the relay output.
The Raspberry Pi GPIO pinout is like this :

I wired it as follows:
- pin 2 (5V) to PIR sensor 5V pin
- pin 6 (GND) to PIR sensor GND pin
- pin 8 (GPIO14) to PIR sensor signal
- pin 4 (5V) to the relay’s “+” pin
- pin 9 (GND) to the relay’s “-“ pin
- pin 10 (GPIO15) to the relay’s “S” pin

Afterthought: there is most probably no need for a relay, the on/off button could be wired directly and one GPIO configured with a pull-up resistor, and driving it to GND would close the circuit. However, first I did not want to bother checking the voltage compatibility, and second I kind of like the fact that the relay emits a clicking sound in this case: it’s an audible cue to the fact that the touchscreen did detect user presence.
I forked the MMM-PIR-Sensor code to only keep the bare minimum I needed and adapt it to my usecase. I could almost have used the original module as is, it already has the capability to drive a relay signal instead of turning the HDMI output on and off. However, in my case the relay is there to simulate the momentary push of a physical button, so I needed to modify the code to close the relay, and re-open it about 100msec later. I also modified the code logic accordingly. Unfortunately, this momentary behavior of the on/off button means that I cannot know in the code whether the display is on or off, so I just assume it’s off at the beginning, and then just oggle it, which works.
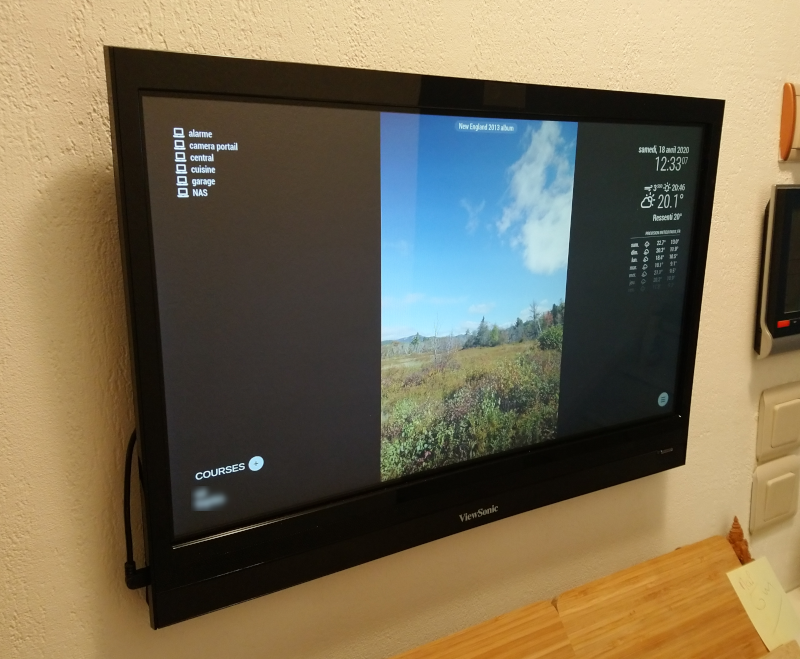
Here’s a final pic of the display mounted on the wall:
Automating MagicMirror startup
Nothing special here, I followed the instructions and used pm2 to autostart MagicMirror.
Source code
FWIW, below are the links to the github repos for my implementation:
- configuration file
- my version of MMM-PIR-Sensor
- my version of MMM-Keyboard, but you should grab the original one
- my version of the MMM-BackgroundSlideShow , but you should grab the original one
- my MMM-TouchPrompt module
- my MMM-ShoppingList module, most likely useless to you since it interacts with my local and very custom server.
- my version of MMM-OnScreenMenu, but you should grab the original one
- my version of MMM-NetworkScanner, but you should grab the original one
Useful links
The place to go if you are interested in module development, or even just in finding and using other people’s modules is the MM forum. Tons of great information and helpful people there.
Lessons learned
- MagicMirror2 is a fantastic framework, I literally went from downloading it to having fully reimplemented my homehub display (including my own custom modules and learning Javascript in the process) within three weeks.
- Javascript is not as terrible as I thought. Pretty sure I produced some really awful Javascript there, but as a means to an end it worked beautifully.
- it took about 20 times shorter to implement this than I originally spent developing my Android-based touch app…and it felt much better while doing it.
Todo list
- add module to control squeezebox music server