
Hue control on Raspberry Pi
This mini-project started when we got a Philips Hue Go light: I wanted to experiment with the associated developer API mostly out of curiosity, and quickly thought of a very simple application: turning on the Hue gradually in the morning at wake up time.
Overview
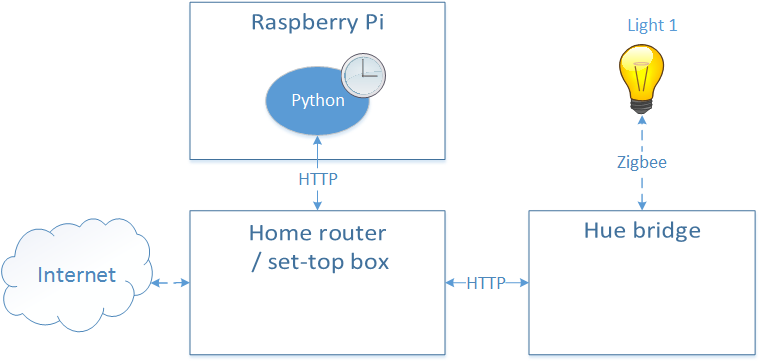
The Hue lighting system is based on a central control point (the Hue bridge) communicating with light devices over Zigbee. There is then an official iPhone/Android application to control lighting (via access to this bridge), which I do not care about in this context.
I considered doing without the bridge and controlling the lights directly from the raspberry pi with a zigbee module, but I did not want to invest a lot of time hacking around with an undocumented protocol, and the cost of the official Hue bridge (~50 euros) is reasonable (unlike the price of the bulbs…) so I went the easy way, bought the official bridge, and therefore only had to learn about the official (and very well documented) Hue API.
The bridge is connected by Ethernet (only) to the home router/LAN, and implements a nice REST API over port 80.
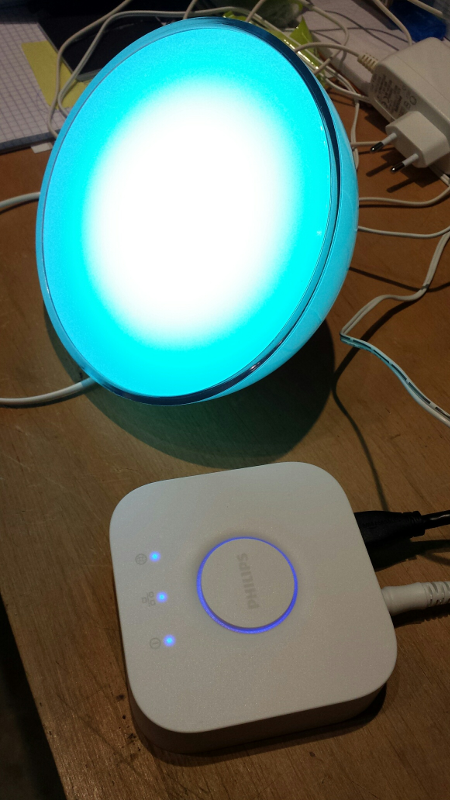
The Hue Go (small portable Hue light with embedded battery) and Hue bridge 2.0 are shown below:
Setup
The only thing I configured specifically is the IP address of the bridge. It gets its IP dynamically over DHCP, and there is then a UPnP discovery mechanism to find it. To simplify things, I assigned it a static IP address in my LAN, in my router’s DHCP configuration. It can also be configured with a static IP address from the parameters section of the official control application, if needed.
On the raspberry pi, the requests library must be installed, it will enable very straightforward GET/PUT/POST HTTP requests to the bridge:
sudo apt-get install python-pip
sudo pip install requests
API summary
The REST API very well documented on the Philips Hue developer site, notes below are captured only as a summary to myself.
API debugger
A browser-based API debugger is available at
http://[bridge IP address]/debug/clip.html
Creating/authorizing a user
Only authorized users registered inside the bridge’s whitelist can control the lights. Creating a whitelisted user is done by pushing the physical button on the bridge, and then POSTing a request at with content :
{"devicetype":"[some arbitrary identifier]"}.
The return data is of the form:
[
	{
		"success": {
			"username": "[generated username]"
		}
	}
]
The returned generated username must then be used to access/alter the state of the light devices.
Read device info
Sending a GET request on :
http://[bridge IP address]/api/[username]
returns a JSON structure containing all information on the network and devices controllable by user [username] on this bridge:
{
	"lights": {xxxxx},
	"groups": {xxxxx},
	"config": {xxxxx},
	"linkbutton": false,
	"portalservices": true,
	"portalconnection": "connected",
	"portalstate": {xxxxx},
	"factorynew": false,
	"replacesbridgeid": null,
	"backup": {xxxxx},
	"whitelist": {xxxxx},
	"schedules": {xxxx},
	"scenes": {xxxxx},
	"rules": {xxxx},
	"sensors": {xxxxx}
}
a GET request on :
http://[bridge IP address]/api/[username]/lights
returns info on all connected lights.
The state of a specific light can be accessed by performing a GET on :
http://[bridge IP address]/api/[username]/lights/[lightId]
Write device state
The state of a specific light can be altered by sending a PUT request to :
http://[bridge IP address]/api/[username]/lights/[lightId]/state
containing a JSON-formatted body specifying which parameters to modify (see an example below).
Color system
The light color can be specified in a variety of ways, I selected the Hue/Saturation/Lightness system.
- the Hue parameter is set using key
hue, with a value….determined experimentally playing with the official app. - the Saturation parameter is set using key
satwith a value from 0 to 254 - the Brightness parameter is set using key
briwith a value from 0 to 254 - turning the light on or off is done using the
onboolean parameter
Orange/Yellow example:
{"on":true, "sat":220, "bri":254,"hue":8378}
Blue example
{"on":true, "sat":229, "bri":254,"hue":41287}
Python script
With json and requests libraries, access to the bridge boils down to a few lines, e.g.:
import requests
import json

url = "http://[Bridge IP address]/api/[username]/lights/1/state"

data_on = {"on":True, "sat":254, "bri":254,"hue":5000}
data_off = {"on":False}

r = requests.put(url, json.dumps(data_on), timeout=5)
Wake-up light application
I chose to implement a simple script performing a ramp-up of light brightness at a fixed hue/saturation, and have this script called at the desired wake-up time by inserting the following line in the crontab:
37 6 * * 1-5 cd /home/pi/hueraspberrycontrol && ./wakeup.py && cd -
(trigs the scripts every day except saturday and sunday at 6:37am)
The code is available here.